
Measure Distance with an HC-SR04 on an Arduino
 By Austin SmallUpdated November 12, 2026
Measure distance with an HC-SR04 on an Arduino, running in your browser before you build it. The HC-SR04 sends a short burst of ultrasound and times its echo, so it measures from 2 cm to 400 cm without touching anything. It needs 5 V, and a large, flat, smooth target reads best.

Try it first, no parts needed
This is the whole project, wired and running in your browser. Press Run simulation, then move the target with the slider, or hold the button to bring your hand close, and watch the Uno print each distance. Here the target never leaves the beam, so you won't see Out of range.

What the HC-SR04 sees
The sketch takes a reading, then waits 100 ms.
Arduino Uno serial monitor115200 baud
What the code does
The sketch starts a reading, times the echo, turns the time into centimetres and prints it, then waits 100 ms and starts again.
// Measure distance with an HC-SR04. A 10 us pulse on TRIG
// starts a reading; ECHO then stays HIGH for 58 us per cm.
const int TRIG_PIN = 10;
const int ECHO_PIN = 9;

void setup() {
  Serial.begin(115200);
  pinMode(TRIG_PIN, OUTPUT);
  pinMode(ECHO_PIN, INPUT);
}

void loop() {
  digitalWrite(TRIG_PIN, LOW);
  delayMicroseconds(2);
  digitalWrite(TRIG_PIN, HIGH);  // a 10 us pulse starts it
  delayMicroseconds(10);
  digitalWrite(TRIG_PIN, LOW);

  // Wait up to 30 ms: 400 cm takes about 23 ms.
  unsigned long echoUs = pulseIn(ECHO_PIN, HIGH, 30000);
  if (echoUs == 0) {
    Serial.println("Out of range");
  } else {
    float cm = echoUs / 58.0;  // 58 us of echo per cm
    Serial.print("Distance: ");
    Serial.print(cm, 1);       // one decimal place
    Serial.println(" cm");
  }
  delay(100);  // at least 60 ms between readings
}const int TRIG_PIN = 10;TRIG on pin 10 and ECHO on pin 9, right under the sensor in the picture. Other digital pins work too; change these two numbers to match.
digitalWrite(TRIG_PIN, HIGH); // a 10 us pulse starts itHolds TRIG HIGH for 10 µs, the start signal the datasheet asks for, after a brief LOW so each pulse starts from LOW.
unsigned long echoUs = pulseIn(ECHO_PIN, HIGH, 30000);Waits for ECHO to go HIGH and times how long it stays HIGH, in microseconds. If nothing comes back within 30 ms, it gives 0. See how a reading works.
float cm = echoUs / 58.0; // 58 us of echo per cmTurns the time into centimetres: the datasheet's 58 µs for each centimetre to the target, there and back.
delay(100); // at least 60 ms between readingsWaits 100 ms before the next reading; the datasheet asks for more than 60 ms between readings, so a new burst doesn't start while the last one's echo is still about.
Want inches? Divide by 148 instead; see the FAQ.
Build it on an Arduino
Now with real parts. Check which pin is which, wire it, get the code, then upload it and watch the distances. Using an ESP32 board? It has its own guide →
Which pin is which: the HC-SR04 pinout
With the two round transducers facing you, the pins along the bottom edge are, left to right, VCC, TRIG, ECHO and GND. The labels are printed beside them.

| Measures | Distance, 2 cm to 400 cm, with ultrasound |
|---|---|
| Supply | 5 V, 15 mA |
| Pins | VCC, TRIG, ECHO, GND |
| Beam | A 15° measuring angle |
| The echo | ECHO stays HIGH 58 µs for each centimetre |
| Readings | More than 60 ms apart |
| Library | None: pulseIn() is built in |
You'll need
- An Arduino Uno and its USB cable
- An HC-SR04
- Four jumper wires, female to male if they go straight onto the sensor's pins
- Software to upload the sketch to the Uno: either Cirkit Designer, free in your browser, or the Arduino IDE, a free download for Windows, macOS and Linux
Wire it
Four wires, each from one of the sensor's pins straight to the Uno.
Tap a connection to see it on the circuit.
HC-SR04 pin Connect to the Uno Show VCC 5V Show TRIG Pin 10 Show ECHO Pin 9 Show GND GND Show Connect GND first if the Uno is already powered, as the datasheet asks; otherwise the module may not work properly.
Get the code
I'm using:Steps 2 and 3 follow the tool you pick.
The project opens with the sketch already in it, so there's nothing to install.
No Arduino IDE yet? Download it free for Windows, macOS or Linux.
The sketch needs no library. Copy it into a new sketch:
How it works line by line is in what the code does, above.
Upload and check it
Plug in your Uno. In Cirkit, open the Build tab, then Upload firmware: click Select Port and pick your Uno, then Upload to Device. The first time, Cirkit asks you to install Cirkit Create Agent, a small desktop helper that lets it reach the board over USB. Then open Upload output and serial monitor and click Start Serial Monitor.
Show me where to click in Cirkit
 HC-SR04 on an Arduino UnoDesignCodeSimulateBuildShare
Select a device port
Select the device port for uploading code and serial communications
COM3 (Arduino Uno)- Open Build
- Choose Upload firmware
- Click Select Port
- Pick COM3 (Arduino Uno)
- Click Upload to Device
- Open Upload output and serial monitor
- Click Start Serial Monitor
In the Arduino IDE, choose Arduino Uno and its port from the board menu, press Upload, then open the Serial Monitor and set it to 115200 baud.
Show me where to click in the Arduino IDE
hc_sr04_distance.ino// Measure distance with an HC-SR04. A 10 us pulse on TRIG // starts a reading; ECHO then stays HIGH for 58 us per cm. const int TRIG_PIN = 10; const int ECHO_PIN = 9; void setup() {OutputSerial Monitor115200 baudCompiling sketch...
Sketch uses 3884 bytes (12%) of program storage space. Maximum is 32256 bytes.
Global variables use 228 bytes (11%) of dynamic memory, leaving 1820 bytes for local variables. Maximum is 2048 bytes.
Uploading...
Distance: 99.4 cm
Distance: 99.5 cm
Distance: 99.4 cm
Distance: 24.9 cm
Distance: 24.8 cm
Done uploading.
- Click the board menu
- Pick Arduino Uno on COM3
- Click Upload
- Wait for Done uploading
- Click Serial Monitor
- Check it is set to 115200 baud
It works when:
- A new distance appears several times a second, such as
Distance: 99.4 cmwith something about a metre away. - You move your hand towards the sensor and the distance drops with it.
- With nothing in front within 400 cm, it prints
Out of range.
Device SerialDistance: 99.4 cmDistance: 99.5 cmDistance: 99.4 cmDistance: 24.9 cmDistance: 24.8 cmOutputSerial MonitorDistance: 99.4 cmDistance: 99.5 cmDistance: 99.4 cmDistance: 24.9 cmDistance: 24.8 cmNot working? If it only ever prints
Out of range, see troubleshooting.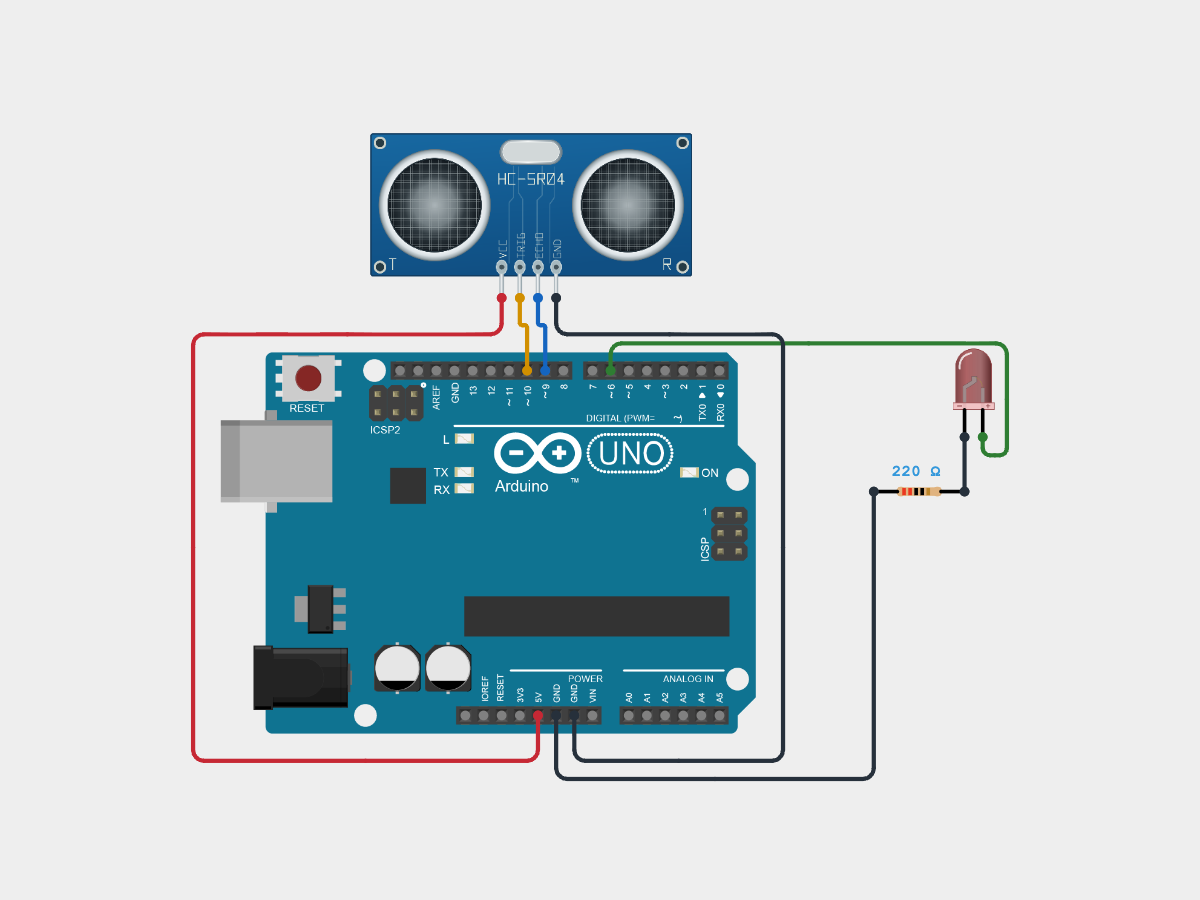
Troubleshooting
Find your symptom; the checks under it run from the most common cause down.
It always prints "Out of range"
No echo reached ECHO within 30 ms. Check, in order:
- TRIG and ECHO aren't swapped. TRIG goes to the pin the sketch drives (10), ECHO to the pin it reads (9).
- VCC is on 5V. The HC-SR04 needs 5 V, so 3V3 isn't enough.
- Something is in front, within 400 cm, big and flat enough; see accuracy and limits.
The distance jumps about
- The target is big, flat and smooth. See accuracy and limits.
- Nothing else sits in the beam. The datasheet's measuring angle is 15°, so an object off to one side can be what it measures.
- Readings are more than 60 ms apart. The datasheet asks for that, so a new burst doesn't start while the last echo is still about.
Nothing in the Serial Monitor, or garbled characters
- The Serial Monitor is set to 115200 baud. It must match
Serial.begin(115200)in the sketch.
How a reading works
The HC-SR04 measures distance by timing sound. When TRIG goes HIGH for 10 µs, the transducer marked T sends eight cycles of ultrasound at 40 kHz. Once the burst has gone out, ECHO goes HIGH and stays HIGH until R hears it come back, so the time ECHO is HIGH is the time the sound took to reach the target and return.

The datasheet gives two ways to turn the time into distance. Its rule of thumb is microseconds ÷ 58 for centimetres (÷ 148 for inches), which is what the sketch uses. Its other formula takes sound at 340 m/s, which works out to ÷ 58.8. The two differ by about 1 %: ÷ 58 matches sound at about 345 m/s, the speed in air at about 23 °C.
TRIG: 10 µs starts it (drawn wider, to see)
ECHO: HIGH from the end of the burst until the sound comes back
Accuracy and limits
| HC-SR04 | |
|---|---|
| Range | 2 cm to 400 cm |
| Best case | The datasheet says its ranging accuracy "can reach" 3 mm; it gives no conditions |
| Beam | A 15° measuring angle; an object anywhere in it can be what it measures |
| Target | At least 0.5 m², as flat and smooth as you can |
| Temperature | Sound is slower in cold air: at 0 °C (331 m/s) the sketch's ÷ 58 reads about 4 % long, at 30 °C (349 m/s) about 1 % short |
| Rate | Readings more than 60 ms apart |
pulseIn() can add a small error of its own: Arduino notes its timing may be off on longer pulses. For readings to the centimetre, check a few known distances on your own board with a tape measure and adjust the sketch's 58 to match.
HC-SR04 or something else?
| How it measures | Range | Interface | Choose it for | |
|---|---|---|---|---|
| HC-SR04 | Ultrasound, 15° beam | 2 to 400 cm | Two digital pins, 5 V | The longest range of these, on two pins with no library |
| Sharp GP2Y0A21YK0F | Infrared, by triangulation | 10 to 80 cm | One analog pin, 4.5 to 5.5 V | Short range on one pin; the target's colour hardly changes the reading |
| ST VL53L0X | Laser time of flight, 25° field of view | Up to 1.2 m by default, 2 m on a white target in the dark | I²C | A 3.3 V board or a shared I²C bus, up to about 1.2 m |
HC-SR04 FAQ
How far can an HC-SR04 measure?
From 2 cm to 400 cm, by its datasheet, on a large, flat target.
How do I get inches?
Divide the echo time by 148 instead of 58, the datasheet's figure for inches:
float inches = echoUs / 148.0;  // 148 us of echo per inch
Serial.print("Distance: ");
Serial.print(inches, 1);
Serial.println(" in");
Does the HC-SR04 work at 3.3 V?
No, it needs 5 V. On a 3.3 V board such as an ESP32, power it from the board's 5V pin and bring ECHO down with a voltage divider; the ESP32 guide shows how.
Why does the sketch wait 100 ms between readings?
The datasheet asks for more than 60 ms between readings, so a new burst doesn't start while the last one's echo is still about. Waiting 100 ms after each reading leaves plenty.
My sensor has five pins and says US-100. Does this work?
Yes, with the jumper on its back removed: then it works like an HC-SR04, with a trigger and an echo pin, and this sketch runs unchanged. With the jumper in place it talks UART at 9600 baud instead. It runs on 2.4 V to 5.5 V.
My sensor is green and says RCWL-1601. Does this work?
Yes. It is HC-SR04 compatible, so this sketch and wiring work unchanged, and it also runs on 3 V, so on an ESP32 it can be powered from 3V3 without the divider.
Do I need a library?
No. pulseIn() is built into Arduino, and the sketch's 58 does the rest.
Simulating the HC-SR04 in Cirkit Designer
Cirkit's HC-SR04 answers the sketch through the Uno's real pins: a TRIG pulse of at least 10 µs starts a reading, and ECHO goes HIGH about 200 µs later for the distance × 58 µs, from 2 to 400 cm. With no target, it sends no pulse. It needs 4.5 to 5.5 V between VCC and GND, and it is tested on the Arduino Uno, the ESP32-S3 and the classic ESP32.
Its echo is exact, with no beam, surface, temperature or noise. Readings still come out a little short at long range (a target at 100 cm prints about 99.4 cm), and the last digit moves by one from reading to reading, aspulseIn()'s timing lands.
References
- HC-SR04 datasheet (ElecFreaks, hosted by SparkFun)
- Arduino: pulseIn() (timing, the timeout, errors on longer pulses)
- NASA Glenn Research Center: the speed of sound
- NASA Glenn Research Center: the standard atmosphere (15 °C at sea level)
- Adafruit: HC-SR04 ultrasonic sonar distance sensor (product 3942)
- Adafruit: ultrasonic distance sensor, 3 V or 5 V, RCWL-1601 (product 4007)
- Adafruit: US-100 ultrasonic distance sensor (product 4019)
- Sharp GP2Y0A21YK0F datasheet
- ST VL53L0X datasheet
- Arduino IDE 2: uploading a sketch