
Print Text on a 16×2 I2C LCD with an Arduino
 By Austin SmallUpdated November 12, 2026
Print text on a 16×2 LCD with an Arduino, running in your browser before you build it. The screen shows two lines of 16 characters, and the small board on its back, the I²C backpack, cuts its wiring to four wires: power, and I²C, a two-wire bus on which SDA carries the data and SCL the clock. The sketch must use the backpack's I²C address; this one uses 0x27, and if yours answers at another, find it.

Try it first, no parts needed
This is the whole project, wired and running in your browser. Press Run simulation and watch the LCD: Hello, world! on the top line, and below it the seconds since the Uno started, counting up. The screen is drawn large under the circuit.

What the LCD shows
The display's 16 × 2 characters, enlarged.
The screen lights up when the simulation runs.
Arduino Uno serial monitor115200 baud
What the code does
The sketch starts the LCD, prints Hello, world! once, then prints the seconds on the second line every second.
// A 16x2 I2C LCD: Hello, world! on line 1 and the seconds
// since the Uno started on line 2, also on the Serial Monitor.
#include <Wire.h>
#include <LiquidCrystal_I2C.h>

LiquidCrystal_I2C lcd(0x27, 16, 2);  // address, columns, rows

void setup() {
  Serial.begin(115200);
  lcd.init();       // start the LCD and its backpack
  lcd.backlight();
  lcd.setCursor(0, 0);  // column 0, line 1
  lcd.print("Hello, world!");
}

void loop() {
  unsigned long seconds = millis() / 1000;
  lcd.setCursor(0, 1);  // column 0, line 2
  lcd.print(seconds);
  lcd.print(" s");
  Serial.print(seconds);
  Serial.println(" s");
  delay(1000);
}LiquidCrystal_I2C lcd(0x27, 16, 2); // address, columns, rowsThe LCD: its backpack's I²C address, then 16 columns and 2 lines. If your screen stays blank, check the contrast, then the address; see troubleshooting.
lcd.init(); // start the LCD and its backpackStarts I²C and sets the LCD up: two lines, the display on, no cursor, the screen cleared. It waits about a second first, so the text appears a moment after the Uno starts.
lcd.backlight();Turns the backlight on. The library starts with it off, so without this line the text is hard to see.
lcd.setCursor(0, 0); // column 0, line 1Puts the next character at column 0 of the top line;
setCursor()numbers columns and lines from 0.print()then writesHello, world!from there, left to right.lcd.setCursor(0, 1); // column 0, line 2Moves to the start of the second line and prints the seconds since the Uno started, then a space and
s. The count only grows, so each new number covers the last one.Serial.print(seconds);Prints the same count on the Serial Monitor, so you can check the board is running even before the screen works.
Build it on an Arduino
Now with real parts. Check which pin is which, wire it, get the code, then upload it and watch the screen. Using an ESP32 board? It has its own guide →
Which pin is which: the I²C LCD pinout
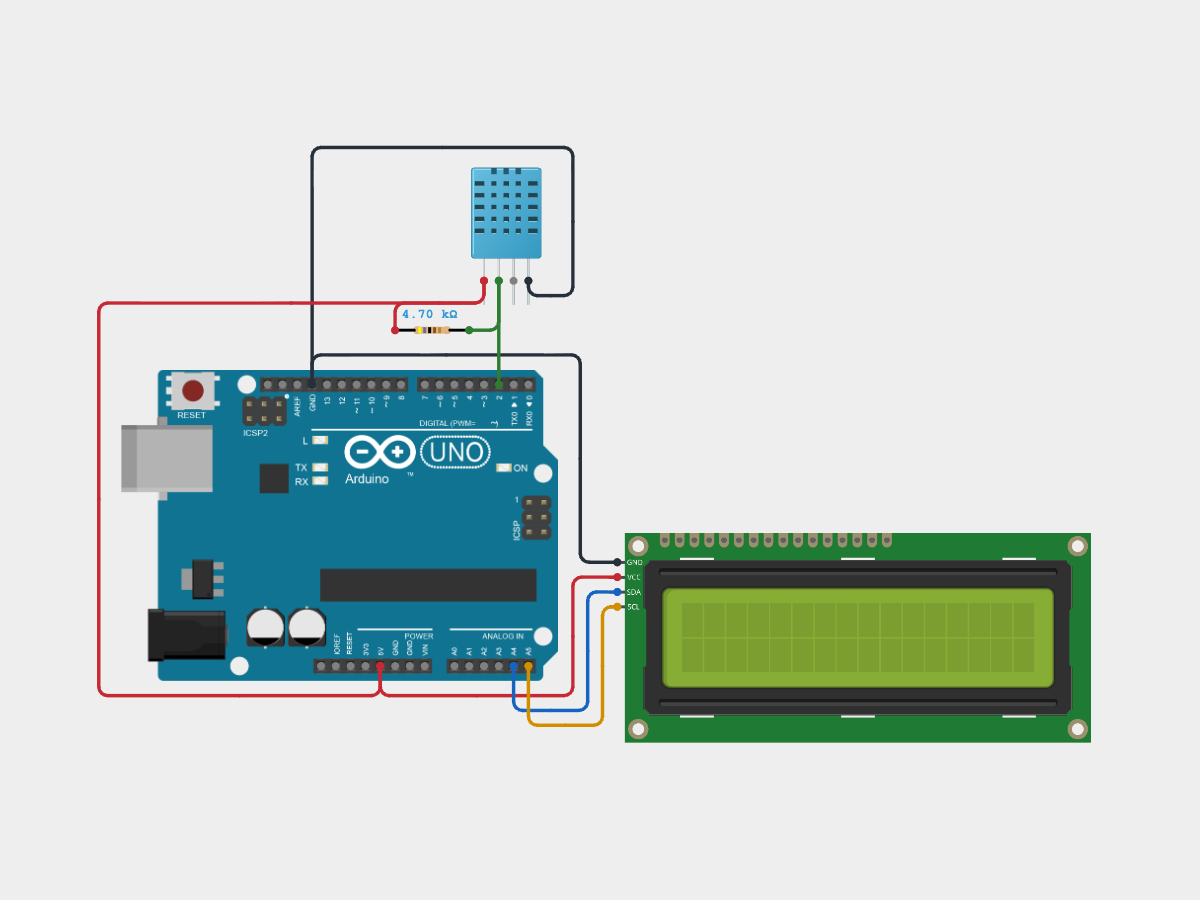
The four pins are on the backpack. On the module pictured they are at the screen's left edge with the screen facing you: GND, VCC, SDA and SCL, top to bottom. Backpacks differ, so wire yours by the labels printed beside its pins.

| Shows | 2 lines of 16 characters, each 5 × 8 dots |
|---|---|
| Pins | GND, VCC, SDA, SCL |
| Supply | 5V on an Uno |
| Interface | I²C: 0x27 or 0x3F with A0 to A2 high |
| Characters | 208 built in, and 8 you can design |
| Library | LiquidCrystal I2C, by Frank de Brabander |
You'll need
- An Arduino Uno and its USB cable
- A 16×2 LCD with an I²C backpack, four pins: GND, VCC, SDA, SCL
- Four female-to-male jumper wires
- Software to upload the sketch to the Uno: either Cirkit Designer, free in your browser, or the Arduino IDE, a free download for Windows, macOS and Linux
Wire it
Four wires, each from one of the backpack's pins straight to the Uno.
Tap a connection to see it on the circuit.
LCD pin Connect to the Uno Show GND GND Show VCC 5V Show SDA A4 Show SCL A5 Show A4 is SDA and A5 is SCL on an Uno. The picture takes GND from the pin beside pin 13; any of the Uno's GND pins works.
Get the code
I'm using:Steps 2 and 3 follow the tool you pick.
The project opens with the sketch and its library already in it, so there's nothing to install.
No Arduino IDE yet? Download it free for Windows, macOS or Linux.
The sketch needs one library. Open the Library Manager (1), search for LiquidCrystal I2C (2), and install the one by Frank de Brabander (3).
Then copy the sketch into a new one:
How it works line by line is in what the code does, above.
Upload and check it
Plug in your Uno. In Cirkit, open the Build tab, then Upload firmware: click Select Port and pick your Uno, then Upload to Device. The first time, Cirkit asks you to install Cirkit Create Agent, a small desktop helper that lets it reach the board over USB. Then open Upload output and serial monitor and click Start Serial Monitor.
Show me where to click in Cirkit
 16x2 I2C LCD on an Arduino UnoDesignCodeSimulateBuildShare
Select a device port
Select the device port for uploading code and serial communications
COM3 (Arduino Uno)- Open Build
- Choose Upload firmware
- Click Select Port
- Pick COM3 (Arduino Uno)
- Click Upload to Device
- Open Upload output and serial monitor
- Click Start Serial Monitor
In the Arduino IDE, choose Arduino Uno and its port from the board menu, press Upload, then open the Serial Monitor and set it to 115200 baud.
Show me where to click in the Arduino IDE
hello_lcd.ino// A 16x2 I2C LCD: Hello, world! on line 1 and the seconds // since the Uno started on line 2, also on the Serial Monitor. #include <Wire.h> #include <LiquidCrystal_I2C.h> LiquidCrystal_I2C lcd(0x27, 16, 2); // address, columns, rows
OutputSerial Monitor115200 baudCompiling sketch...
Sketch uses 4452 bytes (13%) of program storage space. Maximum is 32256 bytes.
Global variables use 452 bytes (22%) of dynamic memory, leaving 1596 bytes for local variables. Maximum is 2048 bytes.
Uploading...
1 s
2 s
3 s
4 s
5 s
Done uploading.
- Click the board menu
- Pick Arduino Uno on COM3
- Click Upload
- Wait for Done uploading
- Click Serial Monitor
- Check it is set to 115200 baud
It works when:
- The backlight comes on and, about a second after the Uno starts, the top line shows
Hello, world! - The second line counts up once a second:
1 s,2 s,3 s. - The Serial Monitor prints the same count.
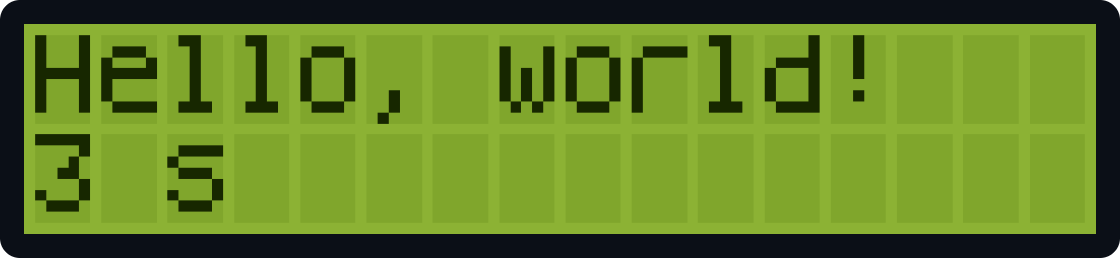
Three seconds in: Hello, world! on the top line and the count below it. Device Serial1 s2 s3 s4 s5 sOutputSerial Monitor1 s2 s3 s4 s5 sNot working? If the screen stays blank, see troubleshooting.
Troubleshooting
Find your symptom; the checks under it run from the most common cause down.
The backlight is on, but there's no text
If the Serial Monitor counts, the Uno is running and the trouble is between it and the screen. The backpack's chip starts with its outputs high, so the backlight comes on even before the sketch reaches it. Check, in order:
- The contrast. Turn the small potentiometer on the back of the backpack slowly, all the way one way and back, while the sketch runs.
- The address. If it isn't the one in the sketch, nothing reaches the screen. Try
0x3Fin place of0x27, or find the address. - SDA goes to A4 and SCL to A5. Swapped, the Uno can't reach the backpack.
No backlight and no text
- VCC is on 5V and GND on GND.
- The sketch calls
lcd.backlight(). The library turns the backlight off when it starts the LCD, so the sketch has to turn it on.
Old characters stay on the screen
The LCD keeps every character until something is written over it. When a number gets shorter, say 10 to 9, its last digit stays behind. Print spaces after it to cover the old digits, or call lcd.clear() before writing the line again.
A backslash shows as ¥
The LCD draws characters from its own character set, not your computer's. On the common one, Hitachi's ROM code A00, code 92 is ¥ where ASCII has a backslash, and codes 126 and 127 are arrows where ASCII has ~ and DEL. Letters, digits and most punctuation match ASCII.
LiquidCrystal_I2C.h: No such file or directory
Arduino IDE only
- The library is installed. Install LiquidCrystal I2C by Frank de Brabander from the Library Manager, as in get the code. Cirkit Designer includes it.
Nothing in the Serial Monitor, or garbled characters
- The Serial Monitor is set to 115200 baud. It must match
Serial.begin(115200)in the sketch.
How the backpack drives the LCD
The LCD itself is an HD44780-compatible character display with 16 pins of its own. The backpack is a small I²C chip, a PCF8574, wired to those pins: the Uno sends it a byte over SDA and SCL, and it sets its eight outputs, P0 to P7, to that byte's bits.

Four of the outputs reach the LCD's data pins, D4 to D7, so the LCD runs in its 4-bit mode: each character goes over in two halves, high half first. The library sets each half on the data pins, then pulses E to latch it. RS tells the LCD whether the byte is a character to show or a command, such as clear or move the cursor, and P3 switches the backlight. That is why lcd.backlight() needs the right address too.
The LCD keeps the text in its own memory, 40 characters for each line, and shows the first 16. Each character is a 5 × 8 dot pattern from its built-in set of 208, or one of 8 you design. The sketch only says where to write and what.
Where to write is the LCD's address counter. setCursor() sets it, line 1 counting from address 0x00 and line 2 from 0x40, and each character written moves it on by one. The figure under the grid follows it in the running circuit.

The address counter is at 0x43: the next character goes to line 2, column 3.
Limits
| 16×2 I²C LCD | |
|---|---|
| Text | 2 lines of 16 characters on screen; each line holds 40 in the LCD's memory |
| Characters | 208 built in (on ROM A00, ASCII letters, digits and most punctuation, plus Japanese katakana and symbols), and 8 of your own, 5 × 8 dots each |
| Speed | Most commands take the LCD up to 37 µs, and clear and home up to 1.52 ms, at its typical 270 kHz clock; the library waits 2 ms after sending clear or home |
| Addresses | 0x20 to 0x27 on a PCF8574 backpack, 0x38 to 0x3F on a PCF8574A: up to eight of a kind on one bus |
| I²C clock | Up to 100 kHz on a PCF8574 |
| Library boards | LiquidCrystal I2C 1.1.2 lists AVR boards, such as the Uno and Nano; it builds for the ESP32 too, with a warning |
To change a number often, write over just that number with setCursor() and a few spaces rather than clearing the screen each time: a clear blanks the whole screen for a moment, and the library waits 2 ms after it.
16×2 I²C LCD or something else?
| Shows | Wiring | Library | Choose it for | |
|---|---|---|---|---|
| 16×2 LCD with an I²C backpack | 2 lines of 16 characters | 4 wires: power and I²C | LiquidCrystal I2C | Readable text with the fewest wires |
| 16×2 LCD without a backpack | The same | Six Uno pins (RS, E, D4 to D7), plus a 10 kΩ potentiometer for the contrast | LiquidCrystal, built into the Arduino IDE | No I²C address to find, if you have the pins to spare |
| 20×4 LCD with an I²C backpack | 4 lines of 20 characters | 4 wires: power and I²C | LiquidCrystal I2C, as lcd(0x27, 20, 4) | More text, with the same wiring and code |
| 128×64 SSD1306 OLED | Text at any size and graphics, 128 × 64 pixels | 4 wires: power and I²C | Adafruit SSD1306 | Graphics or large text. See the OLED guide |
16×2 I²C LCD FAQ
How do I find my I²C LCD's address?
With its address inputs A0 to A2 all high, a backpack answers at 0x27 if its chip is a PCF8574 and 0x3F if it is a PCF8574A, so try those first. To be sure, upload the I²C scanner sketch with the LCD connected and set the Serial Monitor to 9600 baud: it lists every address that answers. Put that address in lcd(…), upload this sketch again and set the Serial Monitor back to 115200.
How do I print a degree sign on the LCD?
Print character 223: lcd.print((char)223);. On the common character set, ROM A00, it's a small raised circle; on the European set, ROM A02, the degree sign is 176. The DHT11 project uses it.
Can I use a 20×4 LCD?
Yes, if it has an I²C backpack. Give the library its size, and use rows 0 to 3 in setCursor():
LiquidCrystal_I2C lcd(0x27, 20, 4); // address, columns, rowsHow do I turn the backlight off?
Call lcd.noBacklight(); lcd.backlight() turns it on again. The text stays, but it is hard to read without the light.
lcd.noBacklight();  // off
lcd.backlight();    // on again
Can I connect two I²C LCDs to one Arduino?
Yes, if their addresses differ. Each backpack's chip has three address inputs, A0 to A2, held high on the board; connect one of them to GND on the second backpack (DFRobot's has jumpers for this), give each LCD its own LiquidCrystal_I2C line with its address, and wire both to A4 and A5.
Does the I²C LCD work with an ESP32?
Yes, through a logic level converter. A backpack whose SDA and SCL pull-ups go to its own supply, as on the main header of DFRobot's DFR0063, holds them at 5 V when it runs on 5 V, more than an ESP32's pins take; the converter keeps the ESP32's side at 3.3 V. The ESP32 guide shows the wiring.
Simulating the 16×2 I²C LCD in Cirkit Designer
Cirkit's LCD answers the LiquidCrystal I2C library over the Uno's real I²C pins, as a PCF8574 backpack on an HD44780: P0 to RS, P1 to RW, P2 to E, P3 to the backlight and P4 to P7 to D4 to D7, in 4-bit mode. It keeps 40 characters a line and 8 characters of your own, and takes a fixed 37 µs or 1.52 ms for each command, the HD44780's times at its typical clock. Its address is 0x27 unless you change it in the part's properties, to any of 0x20 to 0x27 or 0x38 to 0x3F. It needs 2.7 to 5.5 V between VCC and GND, and it is tested on the Arduino Uno and the ESP32-S3.
It draws printable ASCII, the degree sign (223) and a full block (255); other codes show as a box, and the backslash and ~ draw as on a computer, not as ¥ and an arrow as on a ROM A00 chip. There is no contrast to adjust: the text is always clear. It doesn't model current, temperature or the timing of the I²C signals themselves.
References
- Hitachi HD44780U datasheet (hosted by Adafruit)
- Texas Instruments PCF8574 datasheet
- Texas Instruments PCF8574A datasheet
- DFRobot I2C LCD backpack schematic (DFR0063, v1.2)
- LiquidCrystal I2C library, 1.1.2
- Arduino: Liquid crystal displays (the LCD's contrast pin, and wiring one without a backpack)
- Arduino: I²C, and the Uno's SDA and SCL pins
- Arduino Playground: I²C scanner
- Arduino IDE 2: uploading a sketch