
Show Temperature and Humidity on a 16×2 LCD
 By Austin SmallUpdated November 12, 2026
Show the temperature and humidity on a 16×2 LCD, with an Arduino Uno and a DHT11. The top line shows the temperature with a degree sign, the second line the humidity, and both update every two seconds.
It builds on two guides: the 16×2 I²C LCD guide covers the screen on its own, and the DHT11 guide the sensor. A DHT11 is typically within 2 °C, and within 5 percentage points of humidity between 8 and 85 % at 25 °C and 5 V without condensation, so treat the readings as a guide to the room, not a measurement.
Try it first, no parts needed
This is the whole project, running in your browser. Press Run simulation, then move the temperature or the humidity, or hold the button to breathe on the sensor, and watch the LCD follow within two seconds.

The air around the DHT11
The sketch reads it every 2 seconds.
What the LCD shows
The display's 16 × 2 characters, enlarged.
The screen lights up when the simulation runs.
Arduino Uno serial monitor115200 baud
What the code does
The sketch reads the DHT11 every two seconds, clears the LCD and writes the two readings, one to a line.
// A DHT11's readings on a 16x2 I2C LCD: the temperature on
// line 1 and the humidity on line 2, every two seconds.
#include <Wire.h>
#include <LiquidCrystal_I2C.h>
#include <DHT.h>

LiquidCrystal_I2C lcd(0x27, 16, 2);  // address, columns, rows
DHT dht(2, DHT11);                    // DATA on pin 2

void setup() {
  Serial.begin(115200);
  dht.begin();
  lcd.init();
  lcd.backlight();
  lcd.print("Reading...");
}

void loop() {
  delay(2000);  // the DHT11 reads at most every 2 s
  float humidity = dht.readHumidity();
  float temperature = dht.readTemperature();
  lcd.clear();
  if (isnan(humidity) || isnan(temperature)) {
    lcd.print("Read failed");
    Serial.println("Read failed");
    return;
  }
  lcd.print("Temp     ");
  lcd.print(temperature, 1);
  lcd.print((char)223);  // the LCD's degree sign
  lcd.print("C");
  lcd.setCursor(0, 1);   // column 0, line 2
  lcd.print("Humidity ");
  lcd.print(humidity, 1);
  lcd.print(" %");
  Serial.print(temperature, 1);
  Serial.print(" C  ");
  Serial.print(humidity, 1);
  Serial.println(" %");
}DHT dht(2, DHT11); // DATA on pin 2The DHT11 on pin 2. The LCD line above it is the same as in the LCD guide: address 0x27, 16 columns, 2 lines.
lcd.print("Reading...");Shows
Reading...until the first reading, two seconds later. Starting the LCD takes about a second, so that is about three seconds after the Uno starts.delay(2000); // the DHT11 reads at most every 2 sWaits two seconds between readings, as the DHT11's manual asks.
if (isnan(humidity) || isnan(temperature)) {
  lcd.print("Read failed");
  Serial.println("Read failed");
  return;
}
A failed read gives NaN, not a number, so the sketch shows
Read failedand tries again in two seconds. See troubleshooting.lcd.print((char)223); // the LCD's degree signPrints the LCD's own degree sign, character 223, then
C. See how the lines fit.lcd.setCursor(0, 1); // column 0, line 2Moves to the start of the second line for the humidity.
How the two lines fit
Each line of the LCD holds 16 characters, so the sketch lays each reading out to fit: a word, the number to one decimal place, and its unit. At 25.0 °C and 60.0 %, each line comes to 15 characters, and the spaces afterTemp line the two numbers up.

The LCD draws characters from its own set: on the common one, Hitachi's ROM A00, ° is character 223, a small raised circle. A "°" typed into the sketch is stored as two other codes, which the LCD draws as two other characters. So the sketch prints (char)223.
The sketch clears the screen before each reading, so a shorter number, such as 9.0 after 10.0, never leaves an old digit behind.
The readings come from the DHT11 as in its own guide: it answers at most every two seconds, and a failed read gives NaN, which the sketch shows as Read failed. How the DHT11 sends a reading is in the DHT11 guide.
Build it
Now with real parts. Wire it, get the code, then upload it and watch the screen.
You'll need
- An Arduino Uno and its USB cable
- A DHT11 and a 4.7 kΩ resistor, or a three-pin DHT11 module, which has the resistor built in
- A 16×2 LCD with an I²C backpack (GND, VCC, SDA, SCL)
- A breadboard, so the two parts can share the Uno's 5V and GND, and jumper wires: female-to-male for the LCD's four pins
- Software to upload the sketch: Cirkit Designer, free in your browser, or the Arduino IDE
Wire it
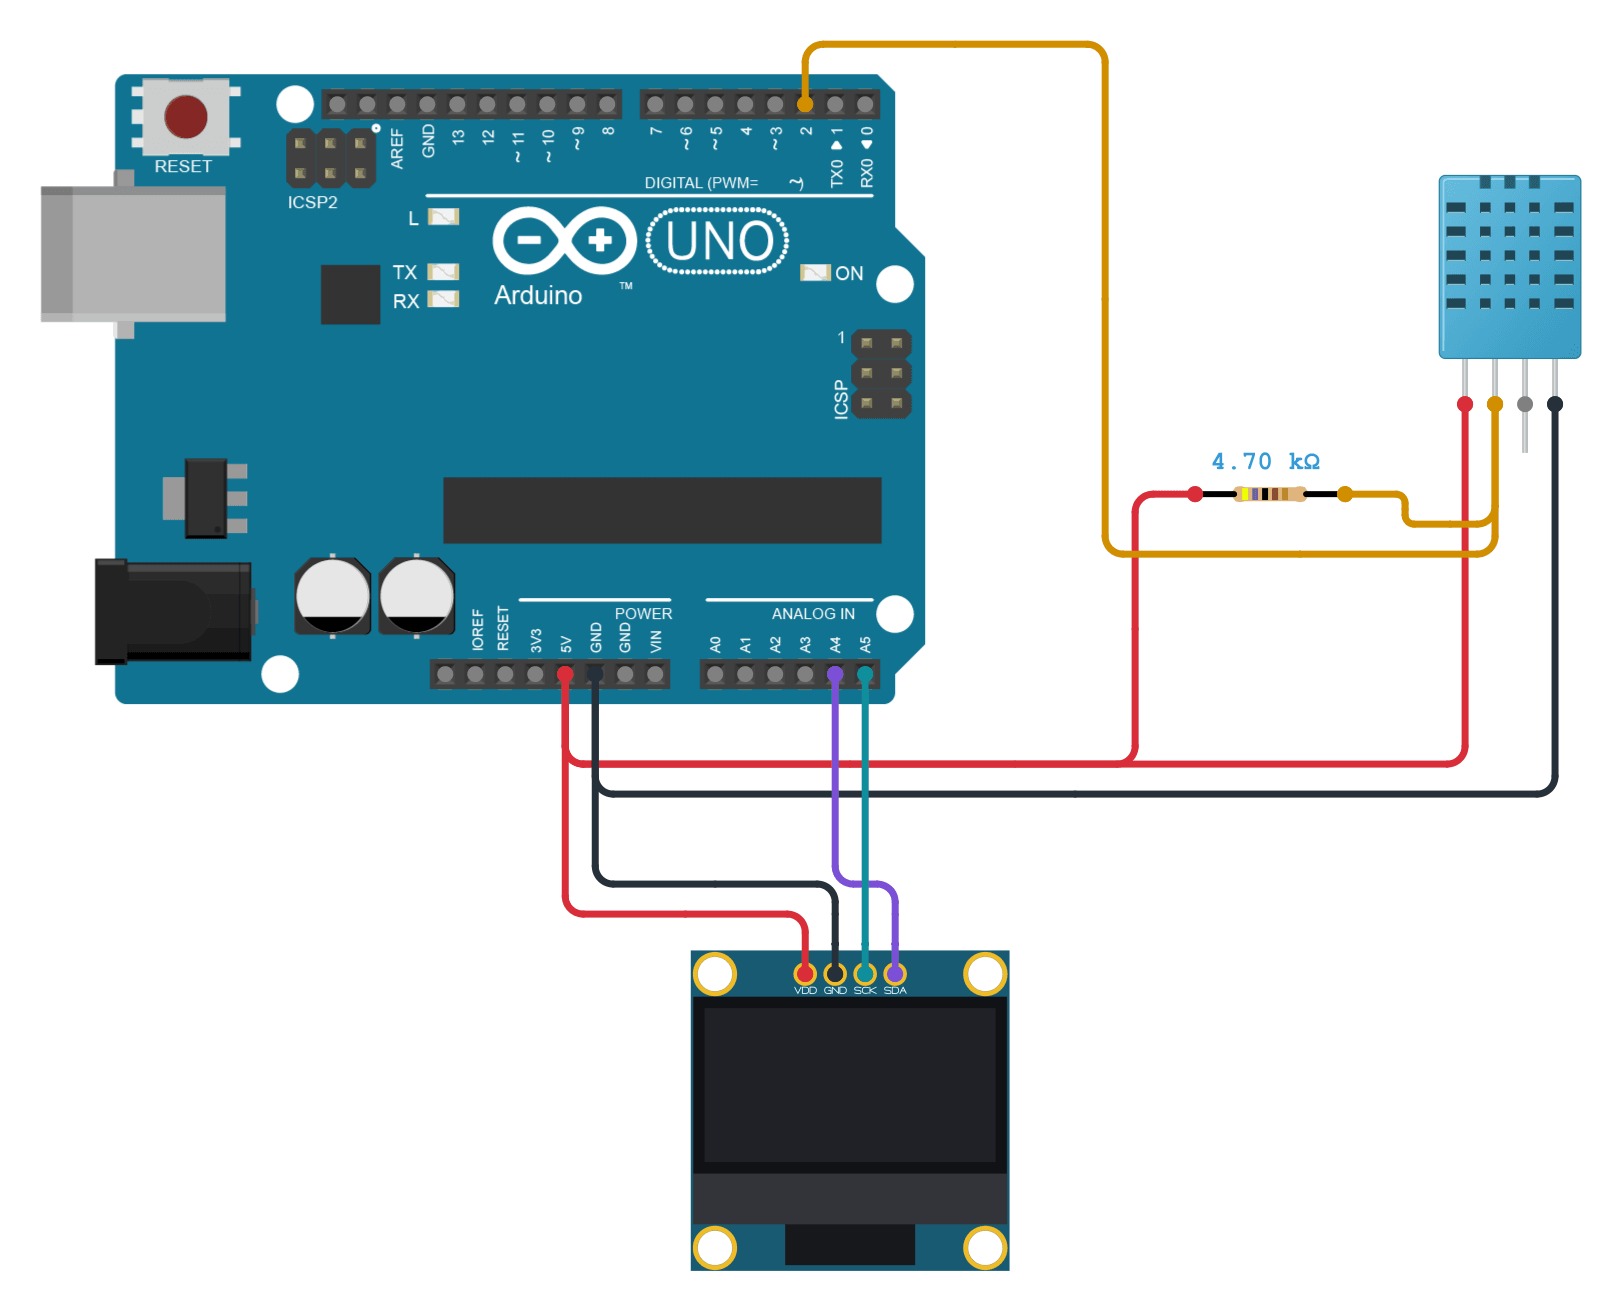
The DHT11 is wired as in the DHT11 guide, and the LCD as in the LCD guide.
Tap a connection to see it on the circuit.
Pin Connect to the Uno Show DHT11 VDD 5V Show DHT11 DATA D2 Show Pull-up 4.7 kΩ resistor from DATA to 5V Show DHT11 NC Leave unconnected Show DHT11 GND GND Show LCD GND GND Show LCD VCC 5V Show LCD SDA A4 Show LCD SCL A5 Show Both parts share 5V and GND. In the picture their wires meet at the Uno's pins; with real parts, run 5V and GND to a breadboard's rails and take both parts' power from there. A three-pin DHT11 module needs no resistor: wire its labelled pins to 5V, D2 and GND.
Get the code
I'm using:Steps 2 and 3 follow the tool you pick.
The project opens with the sketch and its libraries already in it, so there's nothing to install.
The sketch needs two libraries. Open the Library Manager (1), search for LiquidCrystal I2C (2), and install the one by Frank de Brabander (3). Then search for DHT sensor library and install the one by Adafruit; when it asks about dependencies, choose Install all, which adds Adafruit Unified Sensor.
Then copy the sketch into a new one:
How it works line by line is in what the code does, above.
Upload and check it
Plug in your Uno. In Cirkit, open the Build tab, then Upload firmware: click Select Port and pick your Uno, then Upload to Device. The first time, Cirkit asks you to install Cirkit Create Agent, a small desktop helper that lets it reach the board over USB. Then open Upload output and serial monitor and click Start Serial Monitor.
Show me where to click in Cirkit
 DHT11 on a 16x2 I2C LCDDesignCodeSimulateBuildShare
Select a device port
Select the device port for uploading code and serial communications
COM3 (Arduino Uno)- Open Build
- Choose Upload firmware
- Click Select Port
- Pick COM3 (Arduino Uno)
- Click Upload to Device
- Open Upload output and serial monitor
- Click Start Serial Monitor
In the Arduino IDE, choose Arduino Uno and its port from the board menu, press Upload, then open the Serial Monitor and set it to 115200 baud.
Show me where to click in the Arduino IDE
dht11_lcd.ino// A DHT11's readings on a 16x2 I2C LCD: the temperature on // line 1 and the humidity on line 2, every two seconds. #include <Wire.h> #include <LiquidCrystal_I2C.h> #include <DHT.h>
OutputSerial Monitor115200 baudCompiling sketch...
Sketch uses 8032 bytes (24%) of program storage space. Maximum is 32256 bytes.
Global variables use 543 bytes (26%) of dynamic memory, leaving 1505 bytes for local variables. Maximum is 2048 bytes.
Uploading...
25.0 C 60.0 %
25.0 C 61.0 %
25.0 C 66.0 %
25.0 C 74.0 %
25.0 C 80.0 %
Done uploading.
- Click the board menu
- Pick Arduino Uno on COM3
- Click Upload
- Wait for Done uploading
- Click Serial Monitor
- Check it is set to 115200 baud
It works when:
- The LCD shows
Reading..., then the temperature and humidity two seconds later. - You breathe on the sensor and, within a few readings, the humidity on the second line rises.
- The Serial Monitor prints the same reading, like
25.0 C 60.0 %.

A reading of 25 °C and 60 %, then the humidity at 80 % after breathing on the sensor. Device Serial25.0 C 60.0 %25.0 C 61.0 %25.0 C 66.0 %25.0 C 74.0 %25.0 C 80.0 %OutputSerial Monitor25.0 C 60.0 %25.0 C 61.0 %25.0 C 66.0 %25.0 C 74.0 %25.0 C 80.0 %Not working? See troubleshooting.

Troubleshooting
Find your symptom; the checks under it run from the most common cause down.
The LCD stays blank, but the Serial Monitor shows readings
The DHT11 and the Uno work; the trouble is the LCD. Turn its contrast trimmer, check its address and check SDA on A4 and SCL on A5, as in LCD troubleshooting.
The LCD shows "Read failed"
The LCD works, but the DHT11 isn't answering: check its type, pull-up and DATA pin as in DHT11 troubleshooting.
The LCD stays on "Reading..."
- Wait three seconds. The first reading comes about three seconds after the Uno starts: a second to start the LCD, then two.
- Check the Serial Monitor. If it prints readings, the LCD isn't updating: check its wires as in LCD troubleshooting.
The degree sign shows as another character
Print (char)223, as the sketch does, not "°"; see how the lines fit. If 223 shows as ß, your LCD has the European character set, ROM A02, where ° is 176: print (char)176 instead.
"LiquidCrystal_I2C.h" or "DHT.h": No such file or directory
Arduino IDE only
- Both libraries are installed. Install LiquidCrystal I2C by Frank de Brabander, then DHT sensor library by Adafruit with Install all. Cirkit Designer includes them.
Make it yours
- Show Fahrenheit: read the temperature in °F and change the unit the LCD prints.
Change two lines float temperature = dht.readTemperature(true); // °F // and where the unit is printed: lcd.print("F"); - Stop the flicker: clearing the screen blanks it for a moment every two seconds. Instead, print the words once in
setup(), droplcd.clear(), and write each number over the last one at the same place, with a space after it to cover a digit left over. The humidity goes the same way at column 9 of line 2. Print the words again after aRead failed, which writes over them.The temperature, written in place lcd.setCursor(9, 0); // where the temperature starts lcd.print(temperature, 1); lcd.print((char)223); lcd.print("C "); // a space covers a digit left over - More accurate readings over a wider range: swap in a DHT22 and change
DHT11toDHT22. See DHT11 vs DHT22.
FAQ
Why do my readings end in .0?
Because your DHT11 reports whole numbers, as older DHT11s and Cirkit's DHT11 do. Aosong's current DHT11 reports tenths, and the sketch's one decimal place shows them, as it does a DHT22's.
My LCD's address isn't 0x27. What do I change?
The 0x27 in the lcd(…) line. Try 0x3F next: a backpack with a PCF8574A chip answers there when its A0 to A2 are all high. To find yours for certain, see finding the address.
Can I use a 20×4 LCD and show more?
Yes. Change the lcd(…) line to 20 columns and 4 rows, and use setCursor(0, 2) and setCursor(0, 3) for the extra lines, for a heading or the time since the last reading.
Simulating the DHT11 and LCD in Cirkit Designer
Cirkit's LCD answers the LiquidCrystal I2C library over the Uno's real I²C pins, as described in the LCD guide: its degree sign is character 223, and there is no contrast to adjust. The DHT11 is simulated as in the DHT11 guide: whole numbers, with no measurement error or response lag.