
Read Temperature and Humidity with a DHT11 on an Arduino
 By Austin SmallUpdated November 12, 2026
Read a room's temperature and humidity with a DHT11 on an Arduino, and light the Uno's L LED when the air gets too humid, running in your browser before you build it. The DHT11 is the cheap, common sensor for this. It is easy to wire and read, but coarse, at ±2 °C and ±5 %, with a new reading at most every two seconds.

Try it first, no parts needed
This is the whole project, wired and running in your browser. Press Run simulation, then change the air around the sensor, or hold the button to breathe on it, and watch the Uno print each reading. Push the humidity past 60 % and the Uno's small L LED, just left of the Arduino logo, lights up to say the air is too humid.

The air around the DHT11
The sketch reads it every 2 seconds.
Arduino Uno serial monitor115200 baud
What the code does
The sketch asks the DHT11 for a reading every two seconds, prints it, and lights the Uno's L LED when the air is humid.
#include <DHT.h>

DHT dht(2, DHT11);           // DATA on pin 2
const int HUMID_ABOVE = 60;  // % RH

void setup() {
  Serial.begin(115200);
  dht.begin();
  pinMode(LED_BUILTIN, OUTPUT);
}

void loop() {
  delay(2000);  // the DHT11 answers at most every 2 s
  float humidity = dht.readHumidity();
  float temperature = dht.readTemperature();
  if (isnan(humidity) || isnan(temperature)) {
    Serial.println("Read failed: check the wiring");
    return;
  }
  Serial.print(temperature, 1);
  Serial.print(" C  ");
  Serial.print(humidity, 1);
  Serial.println(" %");
  // The Uno's L LED lights when the air is too humid.
  digitalWrite(LED_BUILTIN, humidity > HUMID_ABOVE);
}DHT dht(2, DHT11); // DATA on pin 2Names the pin and the sensor type. The type must be
DHT11; withDHT22every read fails (see troubleshooting).if (isnan(humidity) || isnan(temperature)) { Serial.println("Read failed: check the wiring"); return; }Both reads return NaN when a reading fails, so the sketch checks them with
isnan()before printing anything.digitalWrite(LED_BUILTIN, humidity > HUMID_ABOVE);Lights the Uno's built-in L LED when the humidity is above
HUMID_ABOVE, so you can see the result without a screen.
Want Fahrenheit? Use dht.readTemperature(true); see the FAQ.
Build it on an Arduino
Now with real parts. Check which pin is which, wire it, get the code, then upload it and watch the readings. Using an ESP32 board? It has its own guide →
Which pin is which: the DHT11 pinout
With the grille facing you, the pins are, left to right: VDD, DATA, NC and GND. A three-pin module prints its own labels; go by those.

| Measures | Temperature and relative humidity |
|---|---|
| Supply | 3.3 to 5.5 V (older DHT11s: from 3 or 3.5 V) |
| Temperature | −20 to 60 °C, ±2 °C (older DHT11s: 0 to 50 °C) |
| Humidity | 5 to 95 % RH, typically ±5 % (older DHT11s: 20 to 90 %) |
| Readings | At most every 2 s; in tenths, or whole numbers on older DHT11s |
| Interface | One data wire, with a pull-up resistor |
You'll need
- An Arduino Uno (a Nano or Mega works the same way) and its USB cable
- A DHT11: a bare four-pin sensor, or a three-pin module such as the KY-015
- A 4.7 kΩ resistor, for a bare sensor only; modules have one built in
- A breadboard and five jumper wires
- Software to upload the sketch to the Uno: either Cirkit Designer, free in your browser, or the Arduino IDE, a free download for Windows, macOS and Linux
Wire it
Four connections and one resistor.
Tap a connection to see it on the circuit.
DHT11 pin Connect to the Uno Show 1 VDD 5V Show 2 DATA D2 Show Pull-up 4.7 kΩ resistor from DATA to 5V Show 3 NC Leave unconnected Show 4 GND GND Show Have a three-pin module, such as the KY-015? Skip the resistor; the module has one built in. Connect + or VCC to 5V, S or OUT to D2, and − or GND to GND. Pin order varies between makers, so go by the labels printed on yours.
Get the code
I'm using:Steps 2 and 3 follow the tool you pick.
The project opens with the sketch and the DHT sensor library already in it, so there's nothing to install.
No Arduino IDE yet? Download it free for Windows, macOS or Linux.
First, open the Library Manager (1), search for DHT sensor library (2), and install the one by Adafruit (3); when it asks about dependencies, install them all.
Then copy the sketch into a new one:
How it works line by line is in what the code does, above.
Upload and check it
Plug in your Uno. In Cirkit, open the Build tab, then Upload firmware: click Select Port and pick your Uno, then Upload to Device. The first time, Cirkit asks you to install Cirkit Create Agent, a small desktop helper that lets it reach the board over USB. Then open Upload output and serial monitor and click Start Serial Monitor.
Show me where to click in Cirkit
 DHT11 on an Arduino UnoDesignCodeSimulateBuildShare
Select a device port
Select the device port for uploading code and serial communications
COM3 (Arduino Uno)- Open Build
- Choose Upload firmware
- Click Select Port
- Pick COM3 (Arduino Uno)
- Click Upload to Device
- Open Upload output and serial monitor
- Click Start Serial Monitor
In the Arduino IDE, choose Arduino Uno and its port from the board menu, press Upload, then open the Serial Monitor and set it to 115200 baud.
Show me where to click in the Arduino IDE
dht11_reader.ino#include <DHT.h> DHT dht(2, DHT11); // DATA on pin 2 const int HUMID_ABOVE = 60; // % RH void setup() {OutputSerial Monitor115200 baudCompiling sketch...
Sketch uses 5642 bytes (17%) of program storage space. Maximum is 32256 bytes.
Global variables use 279 bytes (13%) of dynamic memory, leaving 1769 bytes for local variables. Maximum is 2048 bytes.
Uploading...
25.0 C 60.0 %
25.0 C 61.0 %
26.0 C 66.0 %
27.0 C 74.0 %
27.0 C 80.0 %
Done uploading.
- Click the board menu
- Pick Arduino Uno on COM3
- Click Upload
- Wait for Done uploading
- Click Serial Monitor
- Check it is set to 115200 baud
It works when:
- A new line appears every two seconds, like
25.0 C 60.0 %. - You breathe on the sensor and the humidity rises within a few seconds.
- Above 60 %, the Uno's L light comes on.
Device Serial25.0 C 60.0 %25.0 C 61.0 %26.0 C 66.0 %27.0 C 74.0 %27.0 C 80.0 %OutputSerial Monitor25.0 C 60.0 %25.0 C 61.0 %26.0 C 66.0 %27.0 C 74.0 %27.0 C 80.0 %Not working? If you see
Read failed, see troubleshooting.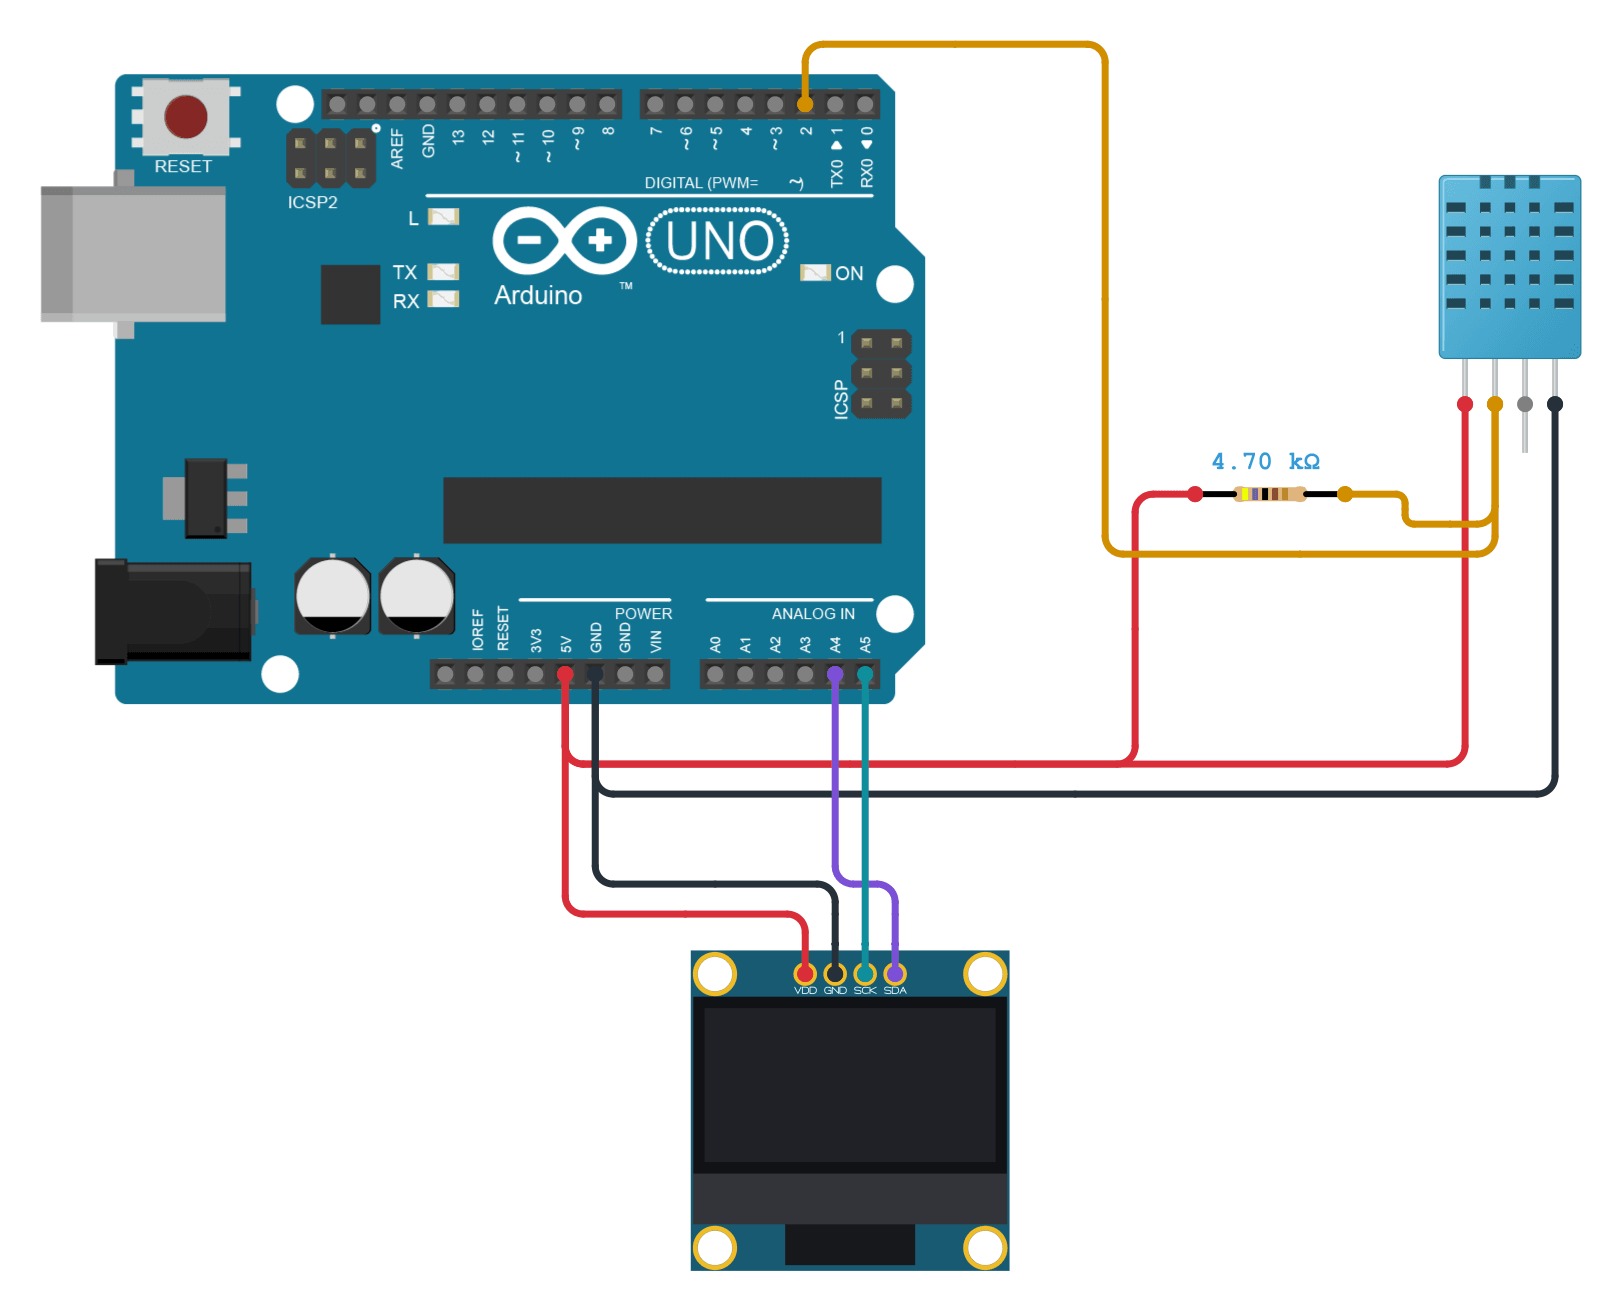
Troubleshooting
Find your symptom; the checks under it run from the most common cause down.
"Read failed", NaN, or "Failed to read from DHT sensor!"
The board asked and got no valid answer. Check, in order:
- The code says
DHT11, notDHT22. WithDHT22the library's start signal is too short for a DHT11, and every read fails. Adafruit's DHTtester example is set toDHT22; change it. - A bare sensor has its pull-up. 4.7 to 10 kΩ from DATA to VDD. A three-pin module has one built in.
- DATA is on the pin the code uses.
DHT dht(2, DHT11)means pin 2. - A module is wired by its printed labels. Three-pin modules order their pins differently between makers.
- VDD and GND aren't swapped. Check pin 1 against the pinout.
- The first reading comes at least 2 s after power-up. Aosong's manual gives the sensor 2 s to start; the sketch's first
delay(2000)covers it.
Nothing in the Serial Monitor, or garbled characters
- The Serial Monitor is set to 115200 baud. It must match
Serial.begin(115200)in the sketch.
"Adafruit_Sensor.h: No such file or directory"
Arduino IDE only
- Adafruit Unified Sensor is installed. The DHT library needs it. Install it from the Library Manager, or reinstall the DHT library and choose Install all when it asks about dependencies. Cirkit Designer includes both.
The same reading over and over
- The sketch waits at least 2 s between readings. Ask more often and the library returns its last reading again.
- Expect each change one reading late. Each reading is the one the sensor took at your previous request. Breathing on it should move the humidity within a few readings.
How a reading works
Behind the vents are a humidity element, a temperature sensor and a small microcontroller. Aosong's older datasheet names them a resistive humidity element and an NTC thermistor, as drawn below; its 2022 manual describes a single combined element. Either way the microcontroller does the measuring and the calibration, so your board only has to ask for the result and decode it.
To ask, your board holds DATA low for about 20 ms. The DHT11 answers with 40 bits on the same wire: a short high is a 0 and a long high is a 1. The five bytes are humidity, its tenths, temperature, its tenths (whose top bit marks below zero), and a checksum. Older DHT11s send both tenths as zero. If the checksum doesn't match, the library throws the reading away.
Exact timing, from Aosong's English datasheet

Aosong's 2022 manual gives slightly different figures: a start signal of 18 to 30 ms, a reply of 83 µs low and 87 µs high, and bits of 54 µs low followed by 23 to 27 µs high for a 0 or 68 to 74 µs for a 1. The library reads both.
Accuracy and limits
| DHT11 | |
|---|---|
| Temperature | ±2 °C. Aosong's current DHT11: −20 to 60 °C, in tenths. Older DHT11s: 0 to 50 °C, in whole degrees. |
| Humidity | Typically ±5 percentage points: a true 50 % can read 45 to 55 %. Aosong's current DHT11 reads 5 to 95 % in tenths; it is specified within its normal 8 to 85 %, tested at 25 °C and 5 V without condensation. Older DHT11s: 20 to 90 %, ±5 % at 25 °C, in whole percent. |
| Reading rate | At most every 2 s, which is also how often the library reads |
| Response | Typically 6 s for a humidity reading to cover 63 % of a change, and 5 to 30 s for temperature, faster with air moving |
| Freshness | Each reading is the one the sensor took at your previous request |
A one-step change is smaller than the error, so set thresholds where a few percent either way doesn't matter. Mount the sensor away from parts that heat up, with air moving past its vents. To tell the versions apart, look at the back: Aosong's current DHT11 is laser-marked ASAIR, with its −20 to 60 °C range.
DHT11 or something better?
| Interface | Temperature | Humidity | Choose it for | |
|---|---|---|---|---|
| DHT11 | One wire | −20 to 60 °C, ±2 °C (older: 0 to 50 °C) | 5 to 95 %, typically ±5 % (older: 20 to 90 %) | A cheap room reading |
| DHT22 | One wire | −40 to 80 °C, ±0.5 °C | 0 to 100 %, ±2 % | The same wiring and code, much better readings |
| AHT20 | I²C | −40 to 85 °C, ±0.3 °C | 0 to 100 %, ±2 % | Accuracy on a small, cheap I²C board |
| BME280 | I²C or SPI | −40 to 85 °C, ±0.5 °C | 0 to 100 %, ±3 % | Air pressure as well, for weather stations |
DHT11 vs DHT22 compares the two DHT sensors in full.
DHT11 FAQ
Why does my DHT11 return NaN or "Failed to read from DHT sensor!"?
Almost always the wiring or the type: check that the code says DHT11, that DATA goes to the pin the code names, and that a bare sensor has its pull-up resistor. Then check you aren't reading within 2 s of power-up. See troubleshooting.
Does the DHT11 work at 3.3 V?
Yes, if it's rated for 3.3 V. Aosong's current manual gives 3.3 to 5.5 V and allows wires up to 1 m at 3.3 V. Its older datasheets start at 3 V (Chinese) or 3.5 V (English), and the English one allows only 20 cm at 3.5 V, because the voltage drop along the wires starves the sensor. The ESP32 guide covers 3.3 V boards.
Do I need the resistor?
On a bare four-pin sensor, yes: 4.7 to 10 kΩ from DATA to VDD. Three-pin modules usually have one fitted already.
How accurate is it?
±2 °C and ±5 % humidity. Good for "is the room too humid", not for small changes. See accuracy and limits.
Can it measure below freezing?
Aosong's current DHT11 reads down to −20 °C; older DHT11s stop at 0 °C. Adafruit's library (1.4.6) decodes a below-zero reading as −1 minus the whole degrees plus the tenths, which doesn't match Aosong's 2022 manual, so check readings below 0 °C against a thermometer. Check the back for the −20 to 60 °C marking. For dependable readings below freezing, a DHT22, AHT20 or BME280 is the safer choice; see the comparison.
How often can I read it?
At most every 2 s, by Aosong's current manual. Adafruit's library reads at most every 2 s too, and returns its last result if you ask sooner.
How do I get Fahrenheit?
Call dht.readTemperature(true). The library also computes the heat index, how warm the air feels at its humidity, in either unit:
float fahrenheit = dht.readTemperature(true);
// Heat index: how warm it feels at this humidity.
float heatIndexF = dht.computeHeatIndex(fahrenheit, humidity);
float heatIndexC = dht.computeHeatIndex(temperature, humidity, false);
Simulating the DHT11 in Cirkit Designer
Cirkit's DHT11 answers the library through the board's real pin, with the timing in Aosong's older English datasheet, so the same code runs on hardware. It is tested on the Arduino Uno, the ESP32 DevKitC and the ESP32-S3. Like an older DHT11, it reads whole numbers from 0 to 50 °C; its humidity goes from 20 to 80 %, short of an older DHT11's 90 %. It adds no measurement error or response lag, and it reports the current values at each request rather than the previous measurement. It gives no reading for its first second after power-up, where Aosong's 2022 manual allows 2 s. On a real sensor, compare a few readings with a reference and give each change time to settle.
References
- Aosong DHT11 manual, December 2022 edition (Chinese, hosted by LCSC)
- Aosong DHT11 manual, older edition (Chinese, hosted by Adafruit)
- Aosong DHT11 datasheet, older edition (English)
- Adafruit DHT sensor library
- Adafruit guide: DHT11, DHT22 and AM2302 sensors
- Aosong AHT20 datasheet (hosted by Adafruit): ±0.3 °C and ±2 %RH typical
- Bosch BME280 datasheet: ±0.5 °C, ±3 %RH, −40 to 85 °C
- Aosong AM2302 (DHT22) datasheet (hosted by Adafruit)