
Build a DHT11 Room Monitor with an OLED Display on an Arduino
 By Austin SmallUpdated November 12, 2026
Build a room monitor from an Arduino Uno, a DHT11 and a small OLED screen. It shows the temperature and humidity, a bar for the humidity, and a label that says when the air is too dry or too humid.
The label says OK from 30 to 60 %, close to the US EPA's advice to keep indoor humidity below 60 %, ideally 30 to 50 %. A DHT11 is typically within 5 percentage points (a true 50 % can read 45 to 55 %), so treat the label as a rough guide. If you haven't used a DHT11 before, the DHT11 guide covers the sensor on its own.
Try it first, no parts needed
This is the whole project, running in your browser. Press Run simulation, then move the humidity above 60 % or below 30 %, or hold the button to breathe on the sensor, and watch the screen change.
The air around the DHT11
The sketch reads it every 2 seconds.
What the OLED shows
The display's 128 × 64 pixels, enlarged.
The screen lights up when the simulation runs.
Arduino Uno serial monitor115200 baud
What the code does
The sketch reads the DHT11 every two seconds and draws the temperature, the humidity and a comfort label on the screen.
// DHT11 room monitor: temperature, humidity and a
// comfort label on a 128 x 64 SSD1306 OLED.
// DHT11: VDD to 5V, DATA to D2, GND to GND, NC unused,
// and a 4.7 kOhm pull-up resistor from DATA to 5V.
// OLED: VDD to 5V, GND to GND, SDA to A4, SCK to A5.
#include <DHT.h>
#include <Wire.h>
#include <Adafruit_GFX.h>
#include <Adafruit_SSD1306.h>

const int DHT_PIN = 2;
// The DHT11 answers at most every 2 s; asked sooner, the
// library repeats its last reading.
const unsigned long READ_INTERVAL_MS = 2000;
// The label's comfort band, in % RH.
const int DRY_BELOW = 30;
const int HUMID_ABOVE = 60;

DHT dht(DHT_PIN, DHT11);
Adafruit_SSD1306 display(128, 64, &Wire, -1);
// The first reading comes 2 s after power-up, once the
// sensor has started.
unsigned long lastRead = 0;
unsigned int failedReads = 0;

const char *comfort(float humidity) {
  if (humidity < DRY_BELOW) return "TOO DRY";
  if (humidity > HUMID_ABOVE) return "TOO HUMID";
  return "OK";
}

// Humidity bar: 0 to 100 % across the screen.
int barX(int percent) { return 1 + percent * 126 / 100; }

void showReading(float t, float h, const char *label) {
  display.clearDisplay();
  display.setTextSize(2);
  display.setCursor(0, 0);
  display.print(t, 1);
  display.write(248);  // degree sign
  display.print('C');
  display.setCursor(0, 20);
  display.print(h, 1);
  display.print(F("%RH"));
  display.drawRect(0, 40, 128, 8, SSD1306_WHITE);
  display.fillRect(1, 41, barX(h) - 1, 6, SSD1306_WHITE);
  // Ticks under the bar mark the comfort band.
  display.drawFastVLine(barX(DRY_BELOW), 48, 3,
                        SSD1306_WHITE);
  display.drawFastVLine(barX(HUMID_ABOVE), 48, 3,
                        SSD1306_WHITE);
  display.setTextSize(1);
  display.setCursor(0, 54);
  display.print(label);
  display.display();
}

void showMessage(const __FlashStringHelper *line) {
  display.clearDisplay();
  display.setTextSize(1);
  display.setCursor(0, 0);
  display.println(line);
  if (failedReads > 0) {
    display.print(F("Failed reads: "));
    display.println(failedReads);
    display.println(F("Check DATA, the pull-up"));
    display.println(F("and DHT11 in the code."));
  }
  display.display();
}

void setup() {
  Serial.begin(115200);
  dht.begin();
  if (!display.begin(SSD1306_SWITCHCAPVCC, 0x3C)) {
    Serial.println(F("NO_DISPLAY"));
    while (true) {}
  }
  display.cp437(true);
  display.setTextColor(SSD1306_WHITE);
  showMessage(F("Waiting for the DHT11"));
}

void loop() {
  if (millis() - lastRead < READ_INTERVAL_MS) return;
  lastRead = millis();

  float humidity = dht.readHumidity();
  float temperature = dht.readTemperature();
  if (isnan(humidity) || isnan(temperature)) {
    failedReads++;
    Serial.print(F("DHT_READ_FAILED count="));
    Serial.println(failedReads);
    showMessage(F("NO READING"));
    return;
  }

  const char *label = comfort(humidity);
  Serial.print(F("T="));
  Serial.print(temperature, 1);
  Serial.print(F(" H="));
  Serial.print(humidity, 1);
  Serial.print(' ');
  Serial.println(label);
  showReading(temperature, humidity, label);
}Adafruit_SSD1306 display(128, 64, &Wire, -1);The screen: 128 × 64 pixels on the Uno's A4 and A5. The
-1means the module has no reset pin wired.const char *comfort(float humidity) { if (humidity < DRY_BELOW) return "TOO DRY"; if (humidity > HUMID_ABOVE) return "TOO HUMID"; return "OK"; }Turns the humidity into the label: below
DRY_BELOWis too dry, aboveHUMID_ABOVEtoo humid.display.fillRect(1, 41, barX(h) - 1, 6, SSD1306_WHITE);Fills the bar in proportion to the humidity, 0 to 100 % across the screen. Two ticks under it mark the comfort band.
if (!display.begin(SSD1306_SWITCHCAPVCC, 0x3C)) {
  Serial.println(F("NO_DISPLAY"));
  while (true) {}
}
Starts the screen at address 0x3C (see how the screen works). If the board can't spare the RAM, the sketch prints
NO_DISPLAYand stops (see troubleshooting). It doesn't check that a screen answers, so with the wrong address the screen just stays blank.if (millis() - lastRead < READ_INTERVAL_MS) return;Reads every two seconds without
delay(), so the board stays free between readings.
How the screen works
The OLED talks over I²C, a two-wire bus: SDA carries the data and SCL (SCK on this module) the clock. The Uno's I²C pins are A4 and A5, and the screen answers at address 0x3C.
The library doesn't draw on the screen directly. It keeps a copy of the screen in the Uno's RAM, one bit per pixel (128 × 64 bits, 1 KB), draws into that, and sends the whole copy when the sketch calls display.display(). That is why showReading() clears, draws everything, then calls display() once: clearing and drawing happen in RAM, so the screen is sent only the finished picture, with no separate blank-screen update.
| Rows | What the sketch draws there |
|---|---|
| 0 to 15 | The temperature, in text twice the normal size |
| 20 to 35 | The humidity, the same size |
| 40 to 50 | The humidity bar, 0 to 100 %, and the ticks at 30 % and 60 % |
| 54 to 61 | The comfort label, in normal-size text |
That copy is why the compiler's report, 1,444 bytes free, overstates what the sketch has: the screen's copy takes 1,024 of them when it starts, leaving about 420. The degree sign is character 248 of the screen's font, which display.cp437(true) numbers the way the original IBM PC character set does.
Build it
Now with real parts. Wire it, get the code, then upload it and watch the screen.
You'll need
- An Arduino Uno (a Nano works the same way) and its USB cable
- A DHT11 and a 4.7 kΩ resistor, or a three-pin DHT11 module, which has the resistor built in
- A 0.96-inch 128 × 64 SSD1306 OLED module with four pins (I²C), sold for 5 V Arduino boards such as the Uno
- A breadboard and nine jumper wires
- Software to upload the sketch: Cirkit Designer, free in your browser, or the Arduino IDE
Wire it
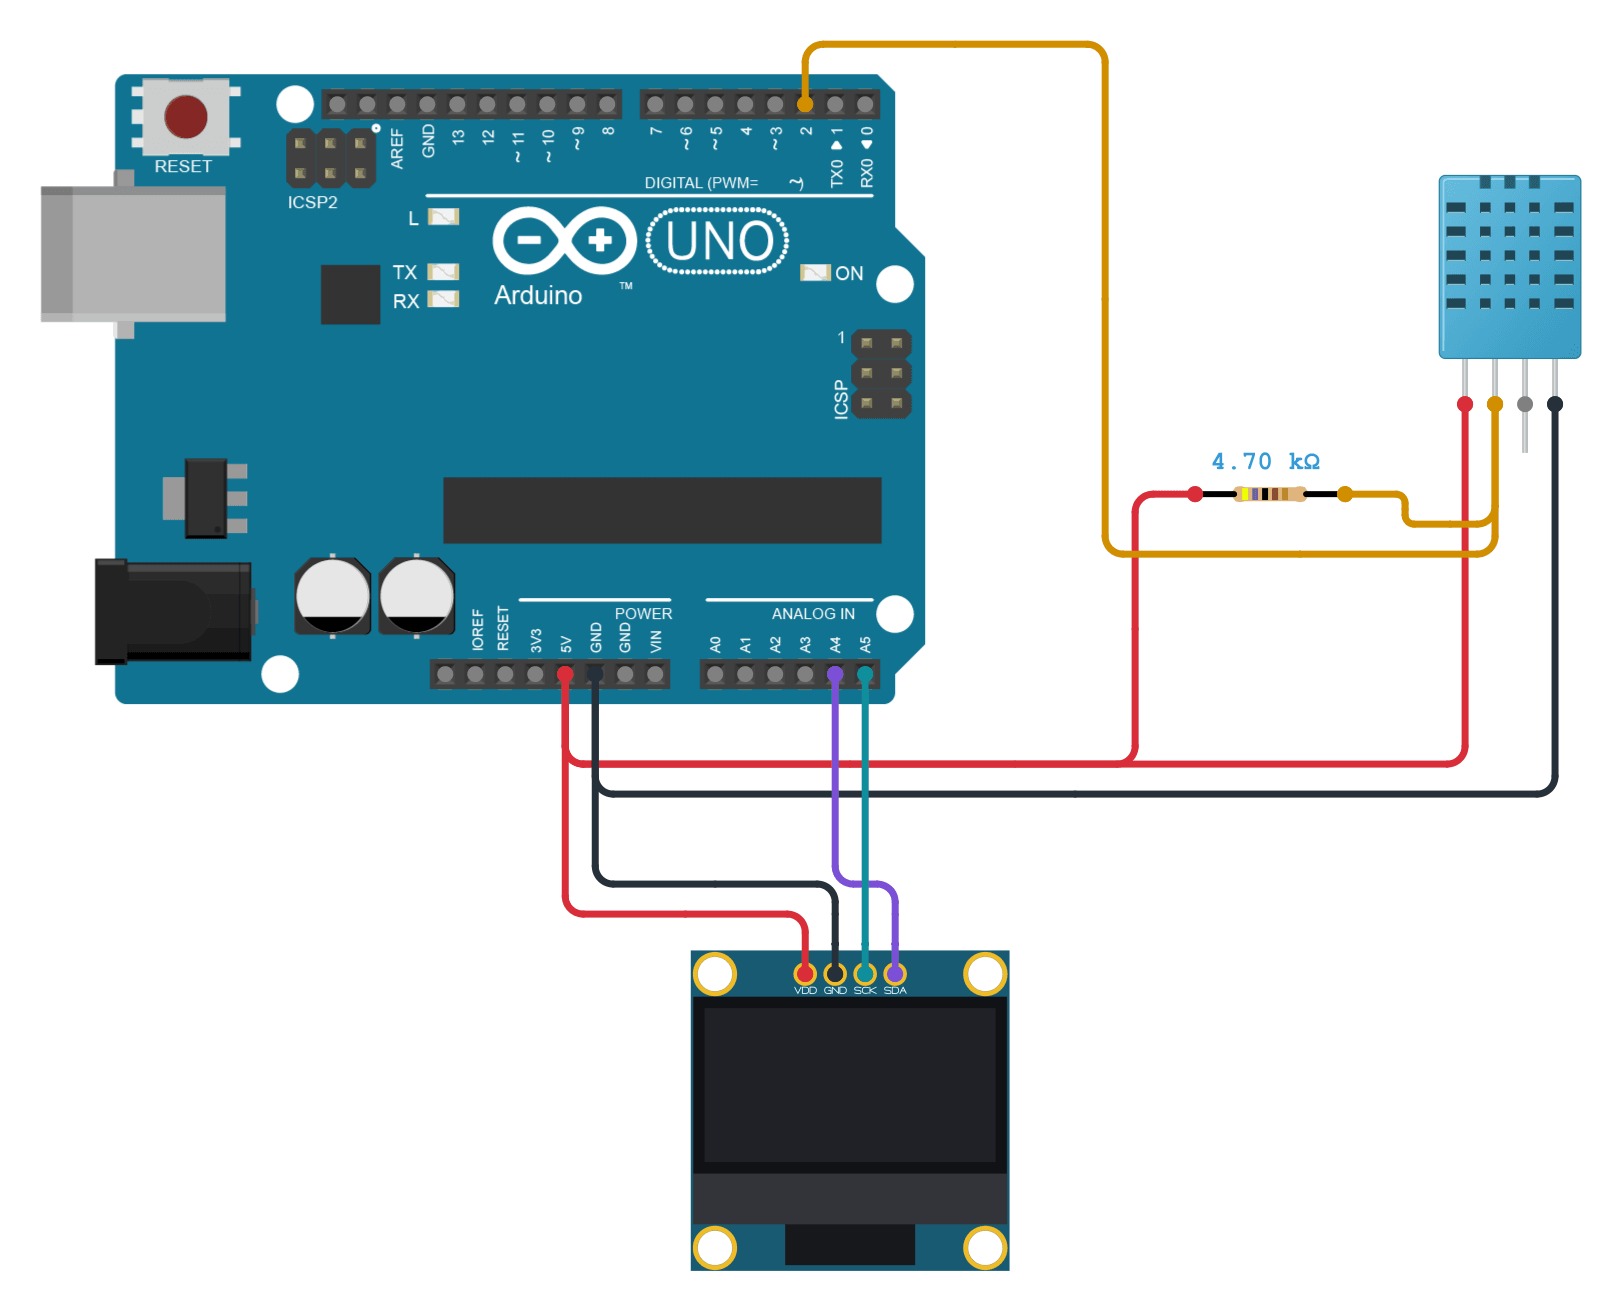
The DHT11 is wired as in the DHT11 guide; the OLED takes four more wires.
Tap a connection to see it on the circuit.
Pin Connect to the Uno Show DHT11 VDD 5V Show DHT11 DATA D2 Show Pull-up 4.7 kΩ resistor from DATA to 5V Show DHT11 NC Leave unconnected Show DHT11 GND GND Show OLED VDD (VCC) 5V Show OLED GND GND Show OLED SDA A4 Show OLED SCK (SCL) A5 Show Wire the OLED by the labels printed on it. Modules put their four pins in different orders; many start with GND, others with VCC. SCK is often printed SCL. On a Nano, SDA and SCL are also A4 and A5. Wire it straight to the Uno only if it's sold for 5 V Arduino boards; see the FAQ.
Get the code
I'm using:Steps 2 and 3 follow the tool you pick.
The project opens with the sketch and its libraries already in it, so there's nothing to install.
The sketch needs two libraries and the ones they depend on. Open the Library Manager (1), search for Adafruit SSD1306 (2), and install the one by Adafruit (3); when it asks about dependencies, choose Install all, which adds Adafruit GFX and Adafruit BusIO. Then do the same for DHT sensor library by Adafruit, which adds Adafruit Unified Sensor.
Then copy the sketch into a new one:
How it works line by line is in what the code does, above.
Upload and check it
Plug in your Uno. In Cirkit, open the Build tab, then Upload firmware: click Select Port and pick your Uno, then Upload to Device. The first time, Cirkit asks you to install Cirkit Create Agent, a small desktop helper that lets it reach the board over USB. Then open Upload output and serial monitor and click Start Serial Monitor.
Show me where to click in Cirkit
 DHT11 room monitorDesignCodeSimulateBuildShare
Select a device port
Select the device port for uploading code and serial communications
COM3 (Arduino Uno)- Open Build
- Choose Upload firmware
- Click Select Port
- Pick COM3 (Arduino Uno)
- Click Upload to Device
- Open Upload output and serial monitor
- Click Start Serial Monitor
In the Arduino IDE, choose Arduino Uno and its port from the board menu, press Upload, then open the Serial Monitor and set it to 115200 baud.
Show me where to click in the Arduino IDE
dht11_room_monitor.ino// DHT11 room monitor: temperature, humidity and a // comfort label on a 128 x 64 SSD1306 OLED. // DHT11: VDD to 5V, DATA to D2, GND to GND, NC unused, // and a 4.7 kOhm pull-up resistor from DATA to 5V. // OLED: VDD to 5V, GND to GND, SDA to A4, SCK to A5. #include <DHT.h>
OutputSerial Monitor115200 baudCompiling sketch...
Sketch uses 18606 bytes (57%) of program storage space. Maximum is 32256 bytes.
Global variables use 604 bytes (29%) of dynamic memory, leaving 1444 bytes for local variables. Maximum is 2048 bytes.
Uploading...
T=25.0 H=60.0 OK
T=25.0 H=61.0 TOO HUMID
T=26.0 H=66.0 TOO HUMID
T=27.0 H=74.0 TOO HUMID
T=27.0 H=80.0 TOO HUMID
Done uploading.
- Click the board menu
- Pick Arduino Uno on COM3
- Click Upload
- Wait for Done uploading
- Click Serial Monitor
- Check it is set to 115200 baud
It works when:
- The screen shows "Waiting for the DHT11", then a reading two seconds later.
- You breathe on the sensor and, within a few readings, the bar grows past the second tick and the label says TOO HUMID.
- The Serial Monitor prints the same reading, like
T=25.0 H=60.0 OK.
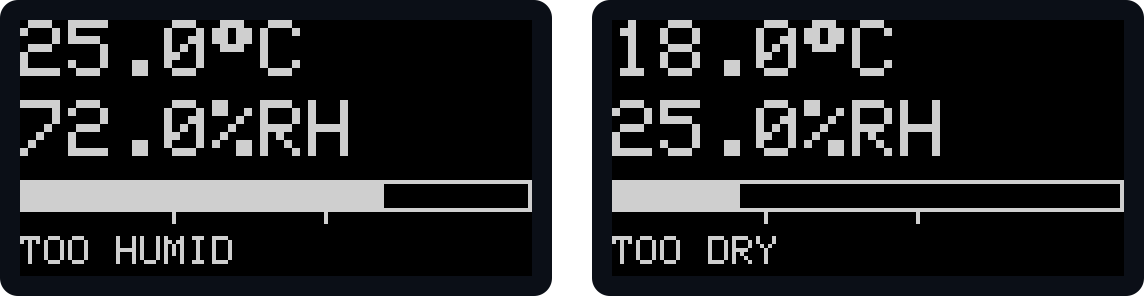
Above 60 % the screen says TOO HUMID (left); below 30 %, TOO DRY (right). Device SerialT=25.0 H=60.0 OKT=25.0 H=61.0 TOO HUMIDT=26.0 H=66.0 TOO HUMIDT=27.0 H=74.0 TOO HUMIDT=27.0 H=80.0 TOO HUMIDOutputSerial MonitorT=25.0 H=60.0 OKT=25.0 H=61.0 TOO HUMIDT=26.0 H=66.0 TOO HUMIDT=27.0 H=74.0 TOO HUMIDT=27.0 H=80.0 TOO HUMIDNot working? See troubleshooting.
Troubleshooting
Find your symptom; the checks under it run from the most common cause down.
The screen stays blank, but the Serial Monitor shows readings
- The OLED is wired by its printed labels. Pin order differs between modules; check VDD (VCC) and GND first.
- SDA goes to A4 and SCK (SCL) to A5. Swapped, the Uno can't reach the screen.
- The address matches. Most modules answer at 0x3C; some, including Adafruit's 128 × 64 boards, at 0x3D. Change
0x3Cindisplay.begin()and upload again, or find the address. - The module is an SSD1306. Some modules that look the same use an SH1106, which needs a different library; see a garbled picture.
The Serial Monitor prints NO_DISPLAY
The library couldn't reserve RAM for its copy of the screen, so the sketch stopped. That copy takes 1 KB of the Uno's 2 KB, and it's reserved only when the screen starts, so the compiler's memory report doesn't include it.
- Your additions leave room for the screen. Keep fixed text in
F("…"), as this sketch does, and avoid large arrays. The sketch as written leaves about 420 bytes free once the screen starts. - The screen size matches your module. A larger size in
display(…)reserves a larger copy.
The screen shows NO READING and a count of failed reads
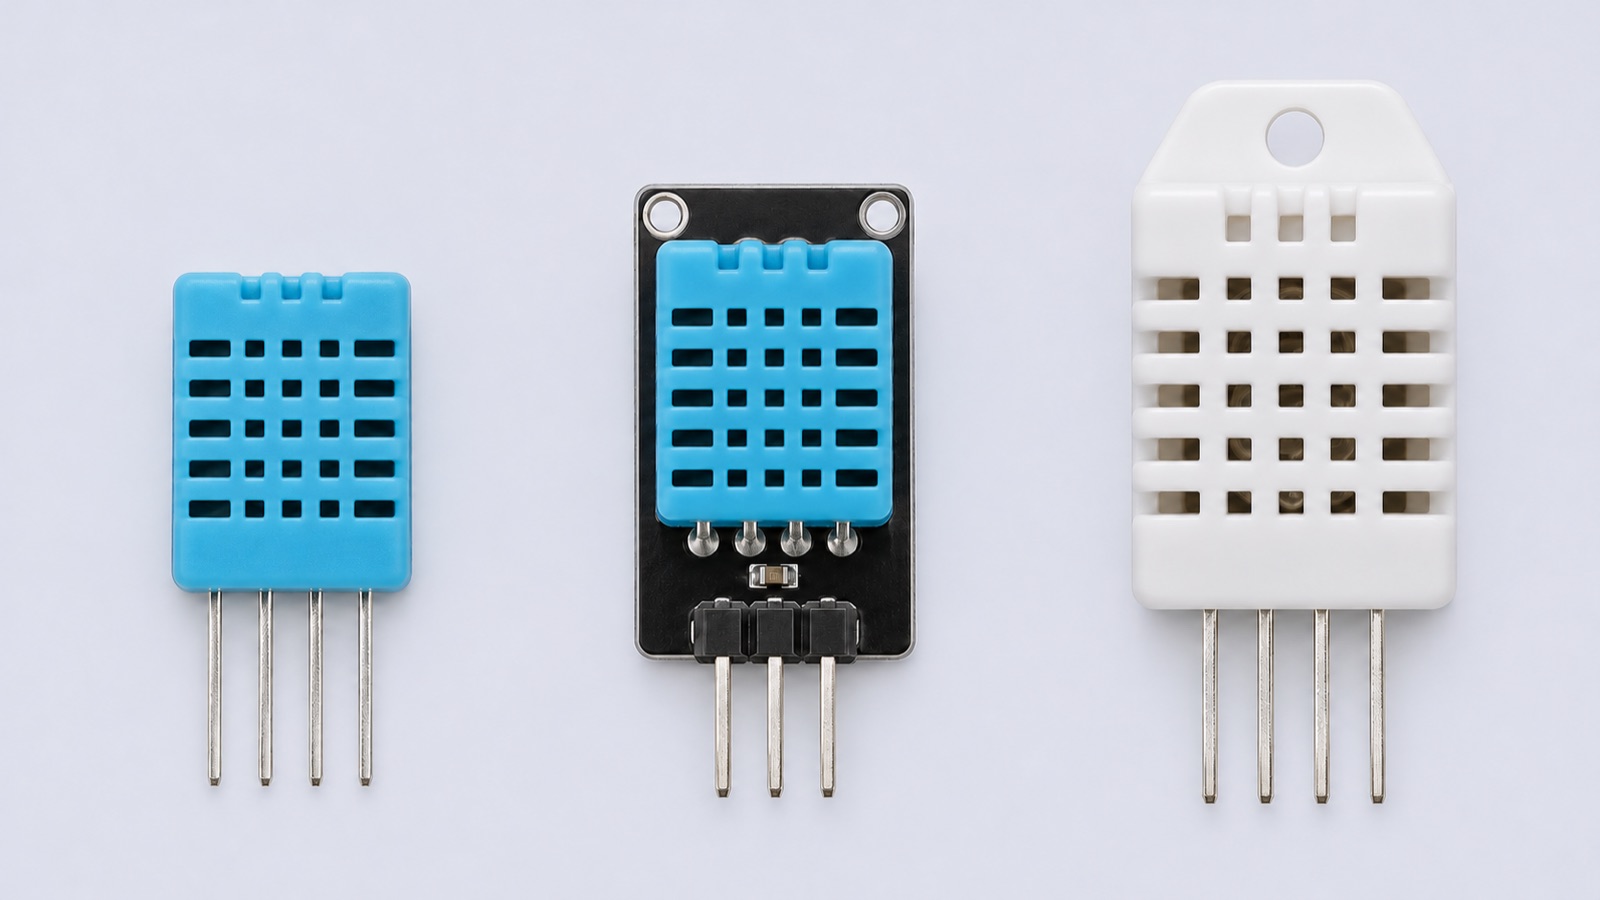
The screen works, but the DHT11 isn't answering: check its type, pull-up and DATA pin as in DHT11 troubleshooting.
The picture is garbled, shifted, or has a stripe of noise
- The module may be an SH1106, not an SSD1306. They look alike; the module's listing or the markings on it say which. An SH1106 needs a library for it, such as Adafruit SH110X, instead of Adafruit SSD1306.
- The screen size in the code matches. A 128 × 32 module needs
display(128, 32, …)and a layout that fits.
"Adafruit_SSD1306.h" or "Adafruit_GFX.h": No such file or directory
Arduino IDE only
- Both libraries are installed, with their dependencies. Install Adafruit SSD1306 and choose Install all, then DHT sensor library the same way. Cirkit Designer includes them all.
Make it yours
- Change the comfort band: edit
DRY_BELOWandHUMID_ABOVE. The ticks under the bar move with them. - Show Fahrenheit: read the temperature in °F and change the unit the screen prints.
- More accurate readings over a wider range: swap in a DHT22 and change
DHT11toDHT22. See DHT11 vs DHT22.
float temperature = dht.readTemperature(true);  // °F
// and in showReading():
display.print('F');
FAQ
Can I use a 128 × 32 OLED?
Yes, with two changes: display(128, 32, …), and a layout that fits half the height, such as the temperature and humidity on one line and the bar under them.
How do I find my OLED's I²C address?
Most 128 × 64 modules answer at 0x3C and some at 0x3D; the number on the back of the board is often written as 0x78 or 0x7A, the same addresses shifted one bit left. If you're unsure, try 0x3D after 0x3C, or upload the I²C scanner sketch with the OLED connected and set the Serial Monitor to 9600 baud: it lists every address that answers. Upload the room monitor again afterwards and return to 115200.
Which pins are SDA and SCL on other boards?
On an Uno or Nano, A4 is SDA and A5 is SCL; the Uno R3 also has them as the two pins beside AREF. On a Mega they're 20 and 21. ESP32 boards let you choose; see the ESP32 guide for the DHT11's side.
Does the OLED run on 3.3 V or 5 V?
It depends on the module. The SSD1306 chip's logic supply is 1.65 to 3.3 V, so a module wired to a 5 V Uno needs a regulator for its supply and SDA and SCL lines that tolerate the Uno's 5 V. Modules sold for 5 V Arduino boards are built for that, and wire straight to the Uno's 5V, A4 and A5; check that the listing says so. A module sold for 3.3 V only needs a 3.3 V supply and an I²C level shifter, which this guide doesn't cover.
Simulating the room monitor in Cirkit Designer
Cirkit's SSD1306 OLED answers the Adafruit library over the Uno's real I²C pins and keeps its picture as a real module does, so the same code runs on hardware. It answers only at 0x3C. The DHT11 is simulated as in the DHT11 guide: whole numbers, with no measurement error or response lag.