
Blink an LED with an ESP32
 By Austin SmallUpdated November 11, 2026
Blink an LED with an ESP32: on for a second, off for a second, as Arduino's Blink example does. It's wired as on an Arduino, with a resistor from a pin to the LED and the LED to GND. The ESP32's pins give 3.3 V, not 5 V, so the same 220 Ω resistor lights a red LED a little less brightly.
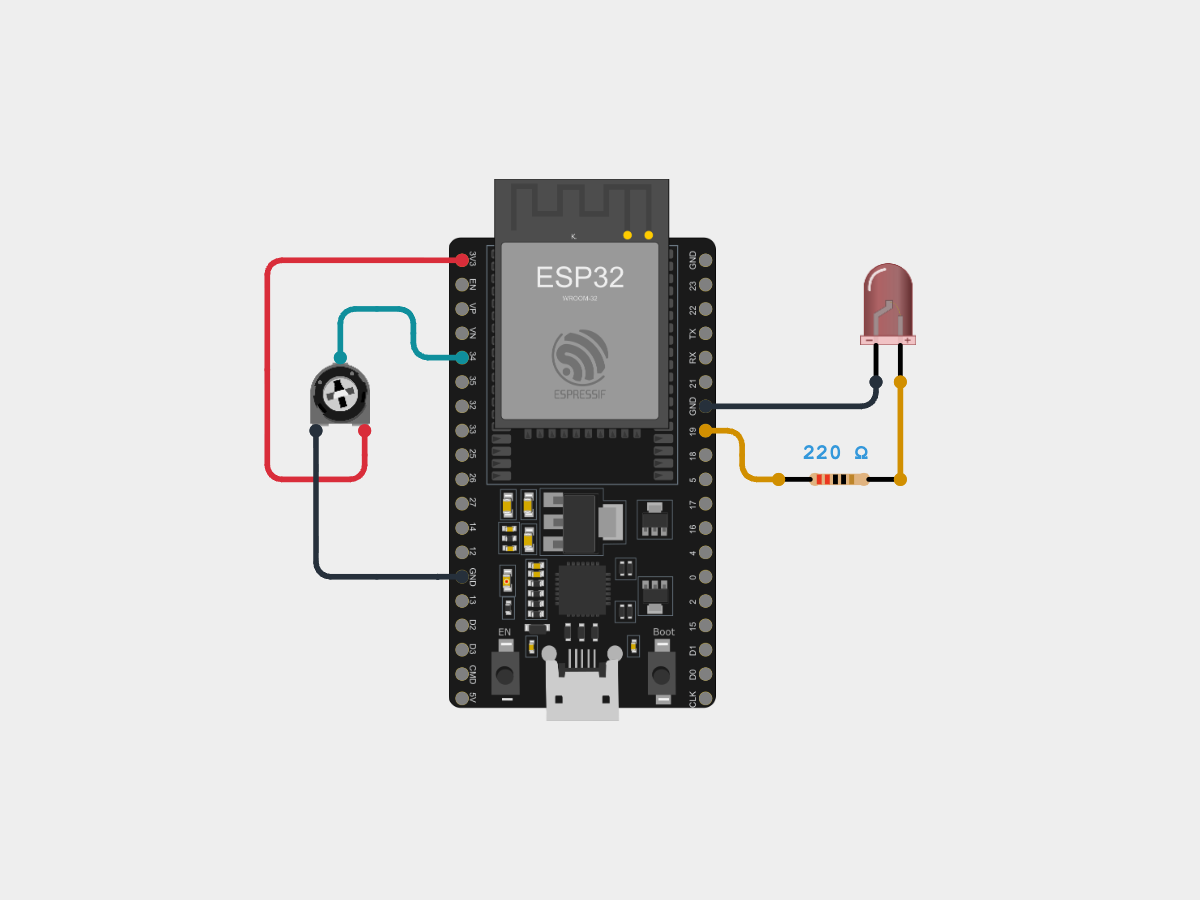
This guide uses an ESP32 DevKitC, the common ESP32-WROOM-32 board, with a red LED on GPIO 19. For which leg is which and how the resistor is worked out, see the LED guide.
Try it first, no parts needed
This is the whole project, wired and running, with an LED on GPIO 19 through a 220 Ω resistor. Press Run simulation. The LED turns on for a second and off for a second, and the Serial Monitor prints LED on and LED off.

The LED, blinking
Its glow, enlarged.
Lights up when the simulation runs.
ESP32 serial monitor115200 baud
What the code does
The sketch switches GPIO 19 on, waits a second, switches it off, waits a second, and repeats.
// Blink: the LED on GPIO 19 on for a second, off for a
// second, and the Serial Monitor says which.
const int LED_PIN = 19;

void setup() {
  Serial.begin(115200);
  pinMode(LED_PIN, OUTPUT);
}

void loop() {
  digitalWrite(LED_PIN, HIGH);  // on
  Serial.println("LED on");
  delay(1000);
  digitalWrite(LED_PIN, LOW);   // off
  Serial.println("LED off");
  delay(1000);
}const int LED_PIN = 19;The LED is on GPIO 19. Most ESP32 pins can blink an LED; see which pins work.
Serial.begin(115200);Opens the serial port at 115200 baud, the speed of the ESP32's own start-up lines too.
pinMode(LED_PIN, OUTPUT);Makes GPIO 19 an output, so the sketch can switch it between 0 V and 3.3 V.
digitalWrite(LED_PIN, HIGH); // onGPIO 19 to 3.3 V: current flows through the resistor and the LED, and it lights. The sketch prints
LED on, anddelay(1000)waits a second.digitalWrite(LED_PIN, LOW); // offGPIO 19 to 0 V: no current, so the LED goes dark for another second, and
loop()starts again.
Build it on an ESP32
With real parts, wire it, get the code, then upload it and watch it blink. Not sure which leg is which? See the LED pinout.
You'll need
- An ESP32 DevKitC (ESP32-WROOM-32) and a USB cable that carries data
- A red LED, 5 mm or 3 mm
- A 220 Ω resistor (red, red, brown bands)
- A breadboard and two jumper wires
- Software to upload the sketch: either Cirkit Designer, free in your browser, or the Arduino IDE with Espressif's ESP32 boards installed
Wire it
Two wires put the LED and its resistor in a row from GPIO 19 to GND.
Tap a connection to see it on the circuit.
Pin Connect to the ESP32 Show LED anode (long leg) 220 Ω resistor, then GPIO 19 Show LED cathode (short leg) GND Show 220 Ω works at 3.3 V. It gives a red LED about 6 mA, (3.3 − 1.9 V) ÷ 220 Ω, against about 14 mA on an Uno.
Get the code
I'm using:Steps 2 and 3 follow the tool you pick.
The project opens with the sketch already in it, so there's nothing to install.
Install the ESP32 boards first: open Tools → Board → Boards Manager, search for esp32 and install esp32 by Espressif. The sketch needs no library. Copy it into a new sketch:
How it works line by line is in what the code does, above.
Upload and check it
Plug in your ESP32. In Cirkit, open the Build tab, then Upload firmware: click Select Port and pick your board, then Upload to Device. The first time, Cirkit asks you to install Cirkit Create Agent, a small desktop helper that lets it reach the board over USB. Then open Upload output and serial monitor and click Start Serial Monitor.
Show me where to click in Cirkit
 Blink an LED with an ESP32DesignCodeSimulateBuildShare
Select a device port
Select the device port for uploading code and serial communications
COM4 (ESP32)- Open Build
- Choose Upload firmware
- Click Select Port
- Pick COM4 (ESP32)
- Click Upload to Device
- Open Upload output and serial monitor
- Click Start Serial Monitor
In the Arduino IDE, choose ESP32 Dev Module and its port from the board menu, press Upload, then open the Serial Monitor and set it to 115200 baud.
Show me where to click in the Arduino IDE
esp32_blink.ino// Blink: the LED on GPIO 19 on for a second, off for a // second, and the Serial Monitor says which. const int LED_PIN = 19; void setup() { Serial.begin(115200);OutputSerial Monitor115200 baudCompiling sketch...
Sketch uses 282203 bytes (21%) of program storage space. Maximum is 1310720 bytes.
Global variables use 20800 bytes (6%) of dynamic memory, leaving 306880 bytes for local variables. Maximum is 327680 bytes.
Uploading...
LED on
LED off
LED on
LED off
Done uploading.
- Click the board menu
- Pick ESP32 Dev Module on COM4
- Click Upload
- Wait for Done uploading
- Click Serial Monitor
- Check it is set to 115200 baud
It works when:
- The LED blinks, on for a second and off for a second.
- After a few start-up lines from the ESP32's boot ROM, the Serial Monitor prints
LED onandLED offin step with the LED.
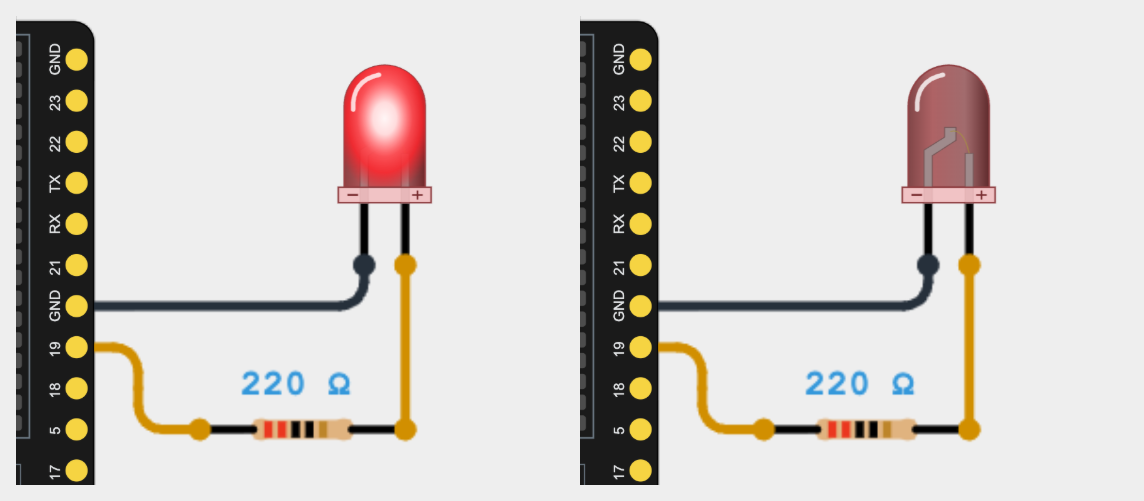
Left: GPIO 19 HIGH and the LED lit. Right: a second later, GPIO 19 LOW and the LED dark. Device SerialLED onLED offLED onLED offOutputSerial MonitorLED onLED offLED onLED offNot working? See troubleshooting.

Which ESP32 pins can drive the LED
Most ESP32 pins can be an output and blink an LED; GPIO 19 is one. Avoid the pins in this table: some can't be outputs, and the others are used for flash memory, for choosing how the chip boots, or for USB.
| Avoid | Classic ESP32 | ESP32-S3 |
|---|---|---|
| Input only | GPIO 34 to 39 | None |
| Flash | GPIO 6 to 11 | GPIO 26 to 32, and 33 to 37 on modules with octal flash or octal PSRAM |
| Boot (strapping) | GPIO 0, 2, 5, 12 and 15 | GPIO 0, 3, 45 and 46 |
| Native USB | None | GPIO 19 and 20, the USB port's D− and D+ |
Troubleshooting
Find your symptom; the checks under it run from the most common cause down.
The LED doesn't light, but the Serial Monitor prints LED on and LED off
The sketch runs, but no current flows through the LED. Check, in order:
- The LED is the right way round. The long leg goes toward GPIO 19, the short leg to GND.
- The wire is on GPIO 19. It must be the pin the sketch names, and not an input-only pin, 34 to 39; see which pins work.
- The circuit is complete. GPIO 19, the resistor, the LED and GND form one loop.
Nothing in the Serial Monitor, or garbled characters
- The Serial Monitor is set to 115200 baud. It must match
Serial.begin(115200)in the sketch. The ESP32's own start-up lines, from its boot ROM, come first at the same speed, so they should be readable too.
No port appears for the ESP32
- The cable carries data. The board's USB port carries its serial link as well as power, so a cable that only charges powers the board but shows no port.
- The board's USB-to-serial chip has its driver. Its name, such as CP210x, is printed on the chip near the USB socket. The driver usually installs itself; if no port appears, install it from the chip's maker (Silicon Labs for a CP210x).
The upload stops at Connecting..., then says Failed to connect
Connecting..., then says Failed to connect- The board is in download mode. Hold BOOT, press and release EN (RST on some boards), then release BOOT, and upload again.
More causes are in the LED guide's troubleshooting.
FAQ
How do I dim the LED on an ESP32?
With PWM, from the ESP32's LED controller, LEDC: analogWrite() works from 0 to 255, or ledcAttach() and ledcWrite() let you choose the speed and resolution. See dim it on an ESP32.
Do I need a different resistor at 3.3 V?
No, 220 Ω works; see wire it. For another current, divide (3.3 V − the LED's forward voltage) by the current, as the LED guide shows.
Does the same code work on an ESP32-S3?
Yes, with the LED on another pin. GPIO 19 is the S3's USB D− pin, so put the LED on another, such as GPIO 4, and set LED_PIN to 4. In the Arduino IDE, choose ESP32S3 Dev Module.
Can I blink the DevKitC's own LED instead?
No. The ESP32 DevKitC's only LED shows that the board has power, and no pin controls it, so wire an LED to a pin as above.
Can I use an RGB LED on an ESP32?
It depends on the LED. Driven straight from the pins through resistors, a 5 mm RGB LED such as the Fedy FD-5WSRGB-A, whose green and blue drop about 3.2 V typically, has only 0.1 V to spare at 3.3 V, so those colours may be dim. The RGB guide runs on a 5 V Uno.
Simulating the LED on an ESP32 in Cirkit Designer
Cirkit runs your compiled sketch on an emulated ESP32, and its LED lights while GPIO 19 is high, as in the LED guide; the LED is tested on the classic ESP32, the ESP32-S3 and the Arduino Uno. Cirkit works with voltages, not current, so the LED is as bright at 3.3 V as at 5 V; a real one is dimmer at 3.3 V.
References
- Arduino: Blink
- Arduino-ESP32: installing the ESP32 boards in the Arduino IDE
- Espressif ESP32-DevKitC user guide (its pins, Boot and EN)
- Arduino-ESP32: LEDC (ledcAttach(), ledcWrite(), analogWrite())
- ESP-IDF: establishing a serial connection (the USB-to-UART bridge and its driver)
- Espressif esptool: troubleshooting (download mode by hand, the boot log at 115200 baud)
- Arduino IDE 2: uploading a sketch (the board menu, Upload, the Serial Monitor)
- Espressif ESP32 datasheet (input-only, flash and strapping pins)
- Espressif ESP32-S3 datasheet (GPIO 19 and 20 as USB D− and D+, strapping pins)
- ESP-IDF: GPIO on the ESP32-S3 (flash and octal memory pins)
- SparkFun: resistors (the colour code)
- Kingbright WP7113ID, 5 mm red LED: datasheet (forward voltage)
- Fedy FD-5WSRGB-A, 5 mm RGB LED: datasheet (green and blue forward voltage)